
There’s a lot of fitness gimmicks out there. The thing that always irritates me is whenever a new trend comes around there is always some group that says it’s the only thing you’ll ever need to do. You could replace everything else you’re doing with this magical activity and you’d be the fittest and healthiest you’ve ever been. Pick your choice of fitness implement, be it barbells, kettlebells, resistance bands, suspension straps, pilates, whatever- there’s someone out there trying to make it the only thing you ever need to do. Sandbags, our topic of today, are no exception.
I’m not a fitness expert but I’ve spent a bit of time learning and doing things. My view of fitness has really evolved to mean a combination of different elements. Strength is a major component of that, but so is endurance, stamina, speed, and mobility.
This is an updated post on my lessons learned about sandbag training. When I first published it in 2018, nearly all of my experience was with “tactical” sandbags, which were light to medium weight and are very useful for training conditioning under load- much like kettlebells. But in the last several years, especially since building up my garage gym, I’ve spent a huge a mount of time working with heavier “strongman” sandbags that work more like stones, and my perspective evolved significantly.
Putting Sandbag Training in Context
Matt Palfrey, in article over at T-Nation (no longer published, unfortunately), put it pretty simply:
Is the sandbag the key to elite strength and conditioning? Probably not. It isn’t a miracle tool and likely not the missing link between you and strength training glory. However, used properly, sandbags can certainly be an effective adjunct to a solid resistance-training program.
– Matt Palfrey, Sandbags For Strength
The sandbag, in its proper context, is a supplemental training tool. I firmly believe that the most direct route to raw strength is with a good barbell training plan. But there is more to a whole athlete than that.
I got my first taste of what could be while I was going through Mountain Tactical Institute’s ‘Waylon’ plan. But the sandbags at my gym were too light to get the intended effect of the program. I bought my own bag to bring to the gym with me shortly after (I’ll get to that in a moment).
The mistake that most people make is trying to treat sandbag training as a variation of barbells or dumbbells. Josh Henkin at Breaking Muscle had this to say:
Most people try to implement sandbags in the same scope as barbells. They squat, clean, press, row, and maybe lunge.They do it for shock value and end up seeing little value because they treat the sandbag like a barbell. It isn’t a barbell. It functions by a completely different set of principles and overall thought concept.
– Josh Henkin, Sandbag Misconceptions: The Truth About Effective Sandbag Training
In other words, stop using the sandbag like it’s an awkward barbell or dumbbell. That’s not to say that you can’t use it to develop a lot of strength. I’ve learned and experienced that heavy sandbags are legitimate strength builders and do a lot to develop your posterior chain, bracing stability, and crushing strength. Cody Janko of The Stone Circle, built a brand around heavy sandbag training combined with calisthenics to build his physique and sell books.
But like the kettlebell minimalists who try and use the one tool for everything, just because you can doesn’t mean you should.
That said, let’s talk about some of the benefits.

Benefits of Sandbag Training
Sandbags, especially strongman style ones without handles, are the epitome of “odd object” lifting. A loaded barbell on the floor with olympic bumpers is designed to be picked up. Everything about it from the knurling, to the balance, and the rotating sleeves facilitate you being able to pick it up efficiently.
Sandbags, and other odd objects, are not. The are bulky, unevenly weighted, and very much give you the impression that they just want to be left alone wherever they are. This is simultaneously what makes them more difficult but also more useful. Typical benefits of sandbag training include:
- Grappling Strength: Without handles, such as strongman-style bags, you must bear-hug the bag and wrestle it around your body. This builds immense chest, lat, and bicep isometric strength, which translates directly to grappling, wrestling, and moving heavy objects in real life.
- Powerful Hip Extension: With heavy bags, particularly near and beyond your own bodyweight, lifting it form the floor to your shoulder requires an explosive hip hinge to bring it from your lap, to your chest, and then to your shoulder. This “triple extension” is one of the most athletic movements you can develop.
- Breathing Under Load: While bear hugging a heavy sandbag and moving around, your diaphragm doesn’t have much space to move. You have to learn to take shallow, pressurized breaths while maintaining the firm bracing throughout your torso.
- General grip strength: The sandbag has over ten different ways to be held, from bear hugging it to pinching material. Working with it and it’s shifting mass has direct benefits to building grip strength.
- Mimics real-life movement: Picking up a bulky mass from the ground and carrying it over your shoulder is a much more “relatable” movement than a strict barbell deadlift or clean. Think about life in Scenario-X where you spend much of your day gathering materials, building fortifications, or moving debris. Sandbags are much better tools for developing that kind of capability.
- Develops core strength: Rob Shaul calls this “chassis integrity” in his plans, but it means core strength. The shifting weight and malleable nature of the sandbag means that your body has to work harder to stabilize and counter it. This also just isn’t in your front, but also up and down your spine as you have to actively fight the bulky weight in front of you from pulling you forward.
- Works in multiple movement planes: Most weightlifting in a single plane of movement like forward-back (bench press), up/down (squat), or rotational (Russian twists). Because the sandbag is bulky and awkward, you’ll be moving through several of these planes at once.
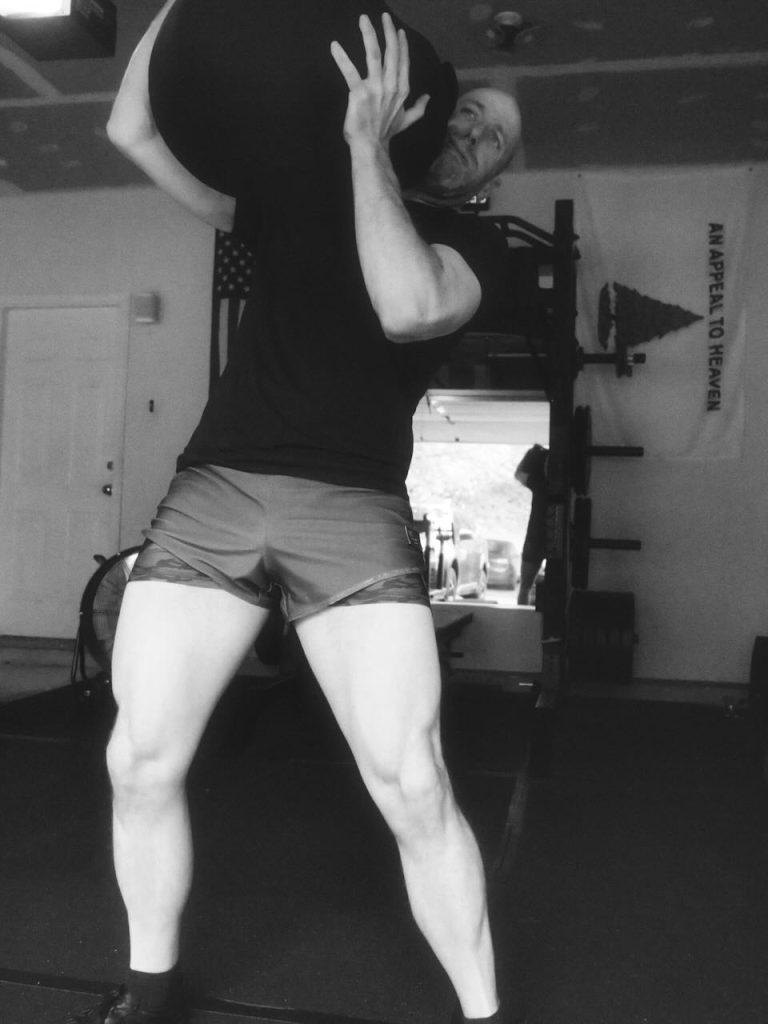
Incorporating Sandbags
People like Cody Janko have done a great job assembling entire strength programs around sandbags and sell books (which I’ve purchased and recommend for some good reading) and coaching on the topic. That said, I don’t like to use sandbags as a primary strength developer. Rather, I like to use them to supplement an existing strength and conditioning program.
Bearing in mind that I usually break training days into either strength days or conditioning days.
On strength days, I typically use heavy sandbags as a finisher near the end of the workout. Maybe it’s doing five reps of ground to shoulder per side. Or it’s a few rounds of picking it up, bear hugging it, and carrying it up and down the driveway a few times as a loaded carry exercise. A third common option might be getups with a lighter bag to challenge multiple planes of movement.
On conditioning days, I often use sandbags as part of a circuit. I have to recognize the work of Brian Alsruhe here. His e-book with 60 different sandbag sessions is awesome and has repeatedly kicked my butt. On these days, you’ll often see me doing circuits of sandbag burpees, loading over a bar, carrying it down the driveway, then hurling it over my shoulder a few times before taking a short rest and repeating.
Or, hell, maybe I just take a medium-heavy bag and try to carry it for a mile in as short a time as possible. That’s amazingly brutal.
My favorite sandbag training exercises
Now we get to the fun part: the work.
Below are some of my favorite exercises with sandbags. You’ll find them scattered around my personal training programs depending on what I’m trying to do at the time.
The Bear Hug Carry
This is, by far, the most common way you’ll see me use heavy sandbags. Starting with the bag on the ground, I pick it up and carry it some distance as quickly as possible. Anywhere between 50-150 yards is a good target. This incorporates a hinge strength element to just get the sandbag off the floor, an explosive element to get it up to the chest, a huge isometric element to hold the bag in place, and a breathing element to learn how to breath “behind the wall” of a braced core.
I really like using these to finish off a lower body strength day.
Sandbag to Shoulder
In this movement, the goal is simply to get a [heavy] sandbag from the ground up to your shoulder. This is a total-body lift. When I use these, I typically do them about the middle of a leg day after I’ve done my primary strength movements like squats.
The Sandbag Get-Up
This is similar to the classic Turkish Get-Up performed with kettlebells, except we’re using a sandbag laying across our chest. From a strict strength standpoint, the sandbag get-up is slightly easier than the kettlebell version since the weight is closer to our center of gravity. I use medium weight sandbags for these and higher reps. If it’s a conditioning day, then I might try and do some number of them in a fixed amount of time.
There aren’t many movements out there more practical than getting up off the ground. Practicing it under load has absolute benefits to everyday strength.
This is a core killer, though.
The movement is very asymmetrical and combines a lot of elements together. You’ve got the oblique sit up on the side with the weight, you’ve got a tricep extension opposite the weight, and you’ve got a lunge movement to get to standing.
Each of these are good movements in of themselves, but the sandbag get-up combines all three into a single movement.
The first time you do a max rep, 10-minute set is a spiritual event. You’ll be deep down the rabbit hole of suck breathing uncontrollably, seeing tweety birds wondering which side of the Great Divide you’re on. The next time getup day rolls around though you focus on controlling your breathing. It still sucks mightily, but you can control your breathing with the heart rate clicking somewhere north of 180. The tweety birds are at bay, getting up and down and up again becomes the sole focus in this moment. You have control of your response to the suck. Improvement.
– Jason Ford, Captain of Houston Fire Department
I’ve also done variations of the side-to-side pull-through but holding a plank rather than crawling. It works well with dumbbells, too.
Sandbag Keg Lifts
I first learned about this while working through Rob Shaul’s program, so why not let him explain it?
You can do this one both standing, as in the video, or kneeling. Intensity is changed by altering the height and weight of the bag. I’ve also seen this used with kettlebells if that’s what you’ve got available.
Sandbag Loading
This is a classic strongman movement where you need to pick a heavy object off the ground and load it onto a platform. It’s very similar to the keg lift above, except it’s much heavier and done without the twist. Since I don’t have a platform, I like to strap down a barbell to my rack at about chest height and use it as a target to get the bag over. You can do this for low reps and very heavy weight, or go for repeated repetitions for time using a medium weight. Either way, prepare to feel sore.
Choosing a Sandbag for Training
If you want to be very cost conscious, you can go cheap and follow the DIY route. There are lots of tutorials out there for taking surplus duffel bags and turning them into fitness equipment. You could even take a super cheap sandbag from Home Depot, fill it, and seal it with duct tape.
I’m going to talk about purpose-build sandbag trainers, though. Generally, I break sandbags up into two categories. The “tactical” category is usually cylindrical and has handles sewn in so you can grab it a variety of ways. These are light to medium weight. The “strongman” style is usually round-ish with no handles, resembling stones, and come in at much heavier weights.
Tactical Sandbags
Here’s my picks for the tactical sandbag variety.
GoRuck
When I decided to buy my own, the first place I thought was GoRuck. I handled the GoRuck sandbags during my last challenge event. They are well constructed and definitely take a beating. This option is covered in padded handles to grab the bag in all sorts of ways.
The catch is that they are pretty expensive for the bag by itself. The inner liner “filler bag” isn’t cheap, either. By the time you get the exterior bag and the filler, you’re in for a good chunk of change.
Don’t think you can avoid the filler bag, either. The GoRuck bags use nice heavy duty zippers along with velcro closure. In other words, they aren’t going to do well with a lot of loose sand flying around on the inside. The filler bag is there to protect it from the contents.
Rogue Fitness
Rogue fitness has a very similar design to the GoRuck bag, and it’s a few dollars cheaper. I don’t see why these wouldn’t work just as well- and you can get them heavier.
MTI Sandbags
At some point during my search, I noticed a lot of pictures and videos had a different bag that I’d not seen for sale anywhere. It looked like a classic military duffel bag but was clearly a sandbag meant for exercise. It had stitched handles running down each side, and it closed by tying off rather than use any zippers or velcro.


It turns out that MTI makes these and sends them to gyms all over. At half the price of a GoRuck, without the need for a filler bag, it seemed like a great solution. I’m happy I did.
It’s basically a big open-ended nylon bag. You close it by trying it shut with some 550 cord. Rope sewn into the mouth stops the cord from slipping off the end. Since I bought mine, MTI has released a second generation that changes the closure to a fastex buckle, which is handy. These are perpetually out of stock, though.
Strongman Sandbags
In this category, every sandbag I have came from Rogue Fitness. These are actually a bit more affordable than the tactical bags because they are so much simpler. They are typically a dual layer of ballistic nylon and a simple closure. Without the need for handles or padding, it simplifies the manufacturing process.
If rogue is too spendy, then there are a variety of companies making essentially identical products. I suspect most of them come from the same one or two factories. My secondary pick would be from Rep Fitness.
Sandbag Filler Options
Sandbags don’t need to be filled with sand. I use it in my strongman bags, but my lighter ones use rubber mulch. The rubber mulch is less dense, which means I can have the bag be fuller for less weight. That avoids too much floppiness. I’ve also combined the two options by using a heavier “sand pill” in the middle of a bag and surrounding it with rubber mulch to fill the rest of the bag out.
If using sand, I suggest Sakrete All-Purpose Sand, which you can get at your local hardware store for about $7 per 50 lbs. A lot of people suggest Play Sand, but I find that to be a little too fine and can seep through the seams of a bag. Which ever sand you get, make sure it’s dry!
Other options I’ve seen people use include:
- Pea gravel
- Rice
- Wood pellets
- Rubber mulch/ground up tires (be mindful of carcinogens with this)
- Beans
- Rope
- Chains
- Salt
The filler you choose is a combination of desired density and movement.
Pick your filler based on what you need the bag to do.
I ultimately chose rubber mulch for my medium bags because it won’t leak out of the bag in puffs of dust over time, nor will it slowly grind at the threads of the bag. Wood pellets degrade over time, especially if they get wet. Same problem with salt.


Sandbag Training Workouts
One last thing before I end, here are a few workouts to get you started.
“Sandbag Murph” by Stew Smith
Rule: You cannot sit the sandbag down during entire event.
I’ve followed Stew Smith for years and even used his books while preparing for the AFROTC version of basic training. He wrote this workout for Military.com.
Using a bag that weighs 40-50lbs:
- Run 1 mile with the bag on your shoulder.
- 50 push presses taking the sandbag to the left and right shoulder (Left shoulder over the head to right shoulder and then back to left shoulder is one rep).
- 200 steps of lunges (100 per leg). Chest carry the sandbag.
- 300 reps but combine 150 reps of situps (chest carry) and 150 squats of sandbag to complete the 100, 200, 300 rep cycle.
Then run 1 mile again with sandbag on the shoulder.
This one looks like a killer. I would expect no less from a routine bearing the same name as the infamous Crossfit “Murph” workout.
Basic Sandbag Workout by Tom Kelso
This comes from an article Tom wrote on Breaking Muscle
- Lap carry around your training facility x 3-6 laps
- Overhead press x 8-20 reps
- Bent-over row x 8-20 reps
- Squat x 15-30 reps
- Lunge x 6-12 reps each leg
- Repeat the sequence
Sandbag Complex by Mountain Tactical Institute
This is a sequence of movements you can use with the sandbag. The workout is to set a time for yourself, say 15 to 20 minutes, and go through this cycle as many times as you can.
In the same vein, since I mentioned them earlier, set a timer and do as many sandbag get-ups as you can within the time.
Sandbag Smoker by Hard to Kill Fitness
Rory at Hard to Kill Fitness put this one together. Use a 40-65 lb bag and try to take as few breaks as possible. This is a pyramid workout, meaning that you follow a progression. In this case, you start at 10 and work your way down to 1.
This means you do 10 reps of the first exercise, then 10 of the next, then 9 of the first, then 9 of the second, and so on.
10-9-8-7-6-5-4-3-2-1
Shoulder to Shoulder Sandbag push press
Sandbag Get-ups
Shoulder to shoulder press
Rest the bag on your left shoulder then push it overhead, bring down to rest it on the right shoulder. Push it back overhead again and move to the original shoulder. That is one complete repetition.
Sandbag getups
Each rep is done per side. So 10 reps means 10 on the let and then 10 on the right. You can either do all reps on one side first and then the other, or alternate left and right for each one. It’s easier to do all on one side first since the transition takes energy as well.
Sandbag EMOM
This is an excerpt from one of the sessions in Brian Alsruhe’s book, and he published a video of it online. Using a medium-heavy bag (slightly under your bodyweight), start a clock for 10 minutes. At the top of every minute, perform three sandbag sprawls to sandbag over shoulders. That means dropping down to the bag like like a pushup with your hands on the bag and feet wide, then pull your feet in and pick up the bag explosively so you hurl it over your shoulder.
After you’ve done this three times, rest for the remainder of the minute. Begin again at the top of the next minute. Repeat until the 10-minute clock expires.
Wrapping Up
That about covers it. Sandbag training is a fantastic supplement to your regular strength and conditioning program. The added bulk and instability of the bag helps attack muscles that you might not normally hit during regular barbell or dumbbell training.
Sandbags range in price from very cheap DIY options to “No way I’m paying that much for that.” If you want to give it a try, it’s ok to start cheaper and see how well it works for you. I like to play the middle ground here with something isn’t too expensive but won’t fall apart on me, either.
Choose your filler based on your needs. Sand is the densest and will add up in weight the quickest, but it also produces a lot of mess. Pea gravel is another good option here, but both require you to use a filler bag liner.
As always, train safely.



This is surprisingly timely. I was running out of ideas on how to use my sandbag I DIYed together.
Glad to be of help! Sandbags can be a real butt kicker if you use them right. I’m paying for my workout this morning, which was a combo of calisthenics and then a grind session of keg lifts and sandbag get-ups. I use a 60lb bag, but I feel like I want to have a couple in different sizes at this point.