With any sort of sighting system, the shooter must accustom himself to the idea that he looks along a straight line, but the trajectory of his projectile is a curve, and he must therefore endeavor to bring the line of sight and the curve of the trajectory into such coincidence as is suitable for his needs. Generally speaking, the field shooter does not adjust his sights in the field, but rather sets them so that he need not consider the curve of the trajectory at practical ranges.
Most field shooting is not precision shooting. Many people believe that marksmanship is all about that one precise hit on a small target at any range. Such a feat is a great demonstration of skill and precision, but it’s rarely what you would actually do in the real world.
Most practical shooters, from big game hunters to military members, do not have the luxury of time to check distance, adjust sights, and take a precisely aimed shot.
In the real world, targets actively try to avoid being shot and they won’t expose themselves long enough for you to go through all those steps. In the 1950s, the Army’s ORO researched how people get shot, and the number one factor was exposure time.
So the challenge for the shooter is balancing accuracy requirements against available time. This is why I advocate that the ability to quickly hit a 10″ target up to 300 yards is more important than trying to print 5 shots into touching holes on that target. That 10″ target at 300 is about 3.2 MOA, so your maximum field accuracy should be about 3 MOA. This will be important later, so keep it in mind. The closer the 10″ target, the more forgiving the accuracy standard.
The Point Blank Zero is one of the most common methods for simplifying the shooting process across a variety of distances. You’ve probably seen it called many things, including the Battlesight Zero (BZO) or Maximum Point Blank Range (MPBR). These are all correct, and involve a sighting method that takes advantage of projectile ballistics.
Bottom Line Up Front
I get a bit nerdy in this article and there’s a fair amount of math and ballistic tables. I’ve always liked the idea of point blank zeroes since I first read about them in Green Eyes Black Rifles by Kyle Lamb, but reality gets in the way of good ideas. Mathematically, the point blank zero, particularly a 50/200-ish one (depending on your rifle and ammunition) makes a ton of sense, but only if the combination of weapon, ammunition, and shooter are up to the accuracy standard that makes it useful.
For most shooters, most of the time, I think a basic 100-yard (or maybe 50-yard) zero is a simpler all-around way to go about things when you also account for factors like accuracy potential of the weapon system and shooter.

The Ballistic Arc
As Col Cooper said in his excellent book, The Art of the Rifle, bullets do not travel in straight lines. When you fire a projectile, it moves in a curve known as a ballistic arc.
Many new shooters believe that a bullet rises for some distance after leaving the muzzle before it begins to fall again. To an external viewer, that makes sense since it appears to be what happens. But the catch is that it’s not the bullet design or the way the barrel is mounted that causes it.
The rifle’s sights are not level with one another. When you aim at a target in front of you the slightly shorter front sight means you naturally point the tip of the barrel a little higher. That forces you to create an initial launch angle for the bullet.
Zeroing a rifle means that you’re picking a point along the bullet’s ballistic arc that intersects with your line of sight.
Ballistic Trajectories
The nice thing about ballistic trajectories is that they are predictable.
If you know the velocity, launch angle, and aerodynamic efficiency of the bullet, you can reasonably predict the flight path of the bullet using math.
This is another chart created by the internet ballistics guru, Molon. It shows the ballistic arc of the same projectile launched at different angles. Each angle corresponds to a different zero.

Look at each of the three arcs, and pay attention to how high the bullet travels over the line of sight (the dotted line at 0). The highest point over the line of sight is the Maximum Ordinate, also called an Apogee. People use both terms interchangeably.
Also notice how the launch angle increases as the far intersection gets further away. By far intersection, I mean the second time the bullet crosses the line of sight. That’s important.
Something else you might notice is that the apogee of the bullet for a 100-meter zero occurs right 100 meters. This has some benefits for practical rifle usage, but I’ll come back to that.
When you establish a point blank zero, you choose a curve shape where the bullet stays within a certain distance above or below the line of sight up to a particular distance. Velocity is a huge part of this as well since more velocity shrinks the group size.
The size of the vital zone you choose affects the usable point blank range. Sure, you can start aiming higher or lower on the target to compensate– but then you’re no longer using the point blank zero as designed.
Remember, the goal of the point blank zero is to remove the guesswork. Aim at center mass of the target and fire. If you’ve chosen your vital zone size and zero well, the rest will take care of itself.
Point Blank Zero in Practice
Let’s use a vital zone of 10″ to represent our standard target size. The point blank zero would be setting in which the bullet impacts no more than five inches above or below the center of the vital zone. The distance from the muzzle, point blank, to the maximum distance before the bullet falls below vital zone threshold is the Maximum Point Blank Range (MBPR).
A larger vital zone means a more generous point blank zero and a longer usable distance for the zero. A smaller vital zone means a more limited MPBR.
Running the Numbers: Establishing MPBR
Your best tool for figuring out a point blank zero is a ballistic calculator. My favorite is JBM Ballistics, but there are many out there that you can install on your phone as well. All you need to do is feed it your data and the desired “vital zone” radius.
For this chart, I am using a Sierra 69gr SMK fired at 2750 fps. I established that velocity from a chronograph in on a 20″ rifle. I’ll work with a desired vital zone radius of 5″. That means above or below the line of sight, so there is a 10″ total vital zone.
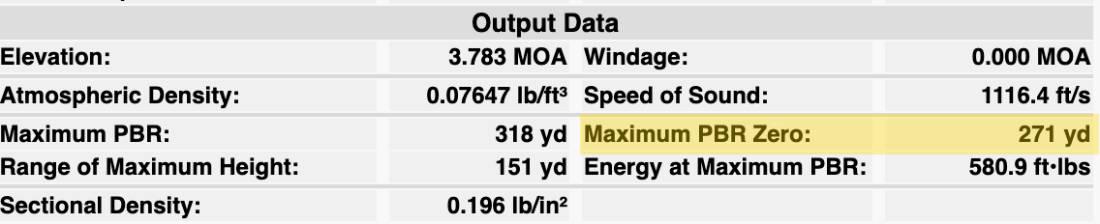
With these values, JBM tells me exactly what the calculated point blank zero should be for my desired 10″ zone: 271 yards. It also tells me I can maintain my center mass hold, the MPBR, all the way out to 341 yards.
As a bonus, JBM also predicts the maximum ordinate at 151 yards.
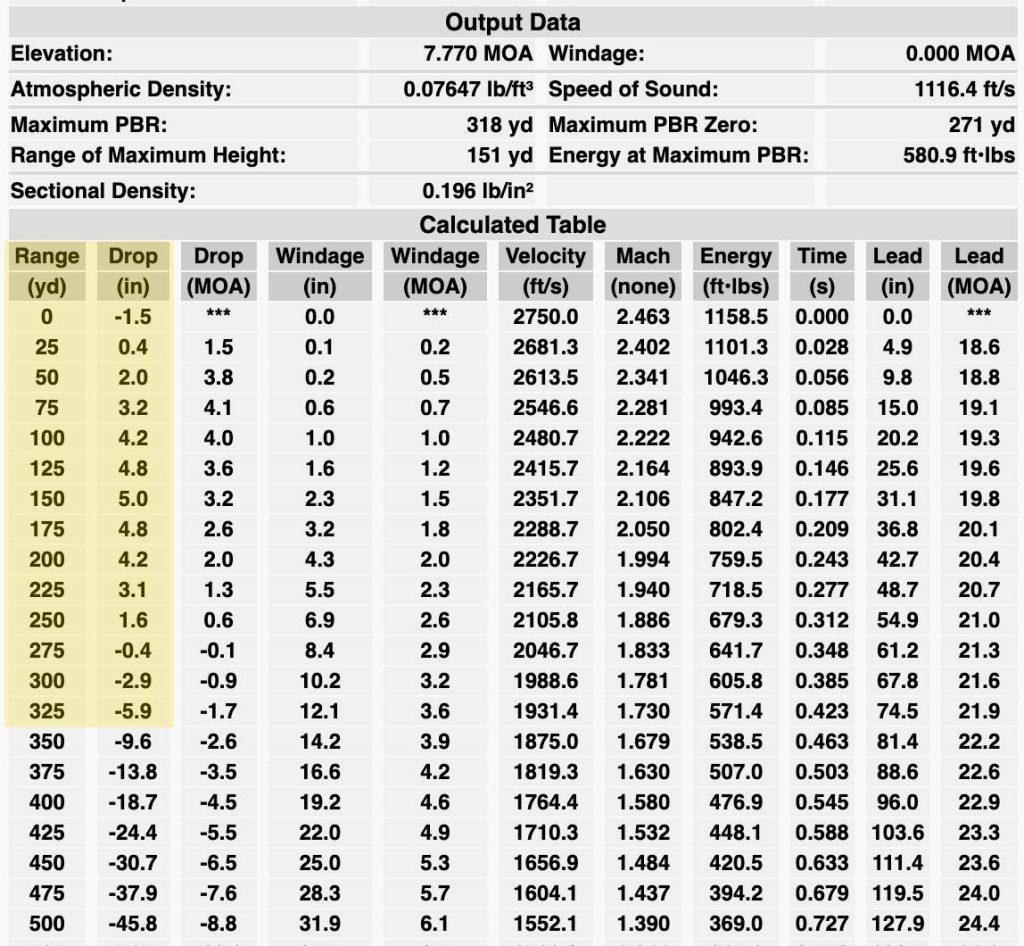
If I go back into the calculator again using the same ballistic data and set my zero to 271 yards, you can follow the arc of the bullet using this drop chart. I’ve shaded the important area in yellow. Notice how the bullet stays within +/- 5″ of the line of sight within that shaded area, dropping just below it at the 325-yard mark.
Point Blank Zero on Paper
Ok, I’ve shown you the numbers, so it’s not just an opinion. But the numbers are one thing, how does this actually work for real life?
Zeroing at exactly 271 yards isn’t very practical, but it works as a guideline. Increasing my point blank zero to 300 yards gives me similar results, with a drop of 6.2 inches at 350 yards.
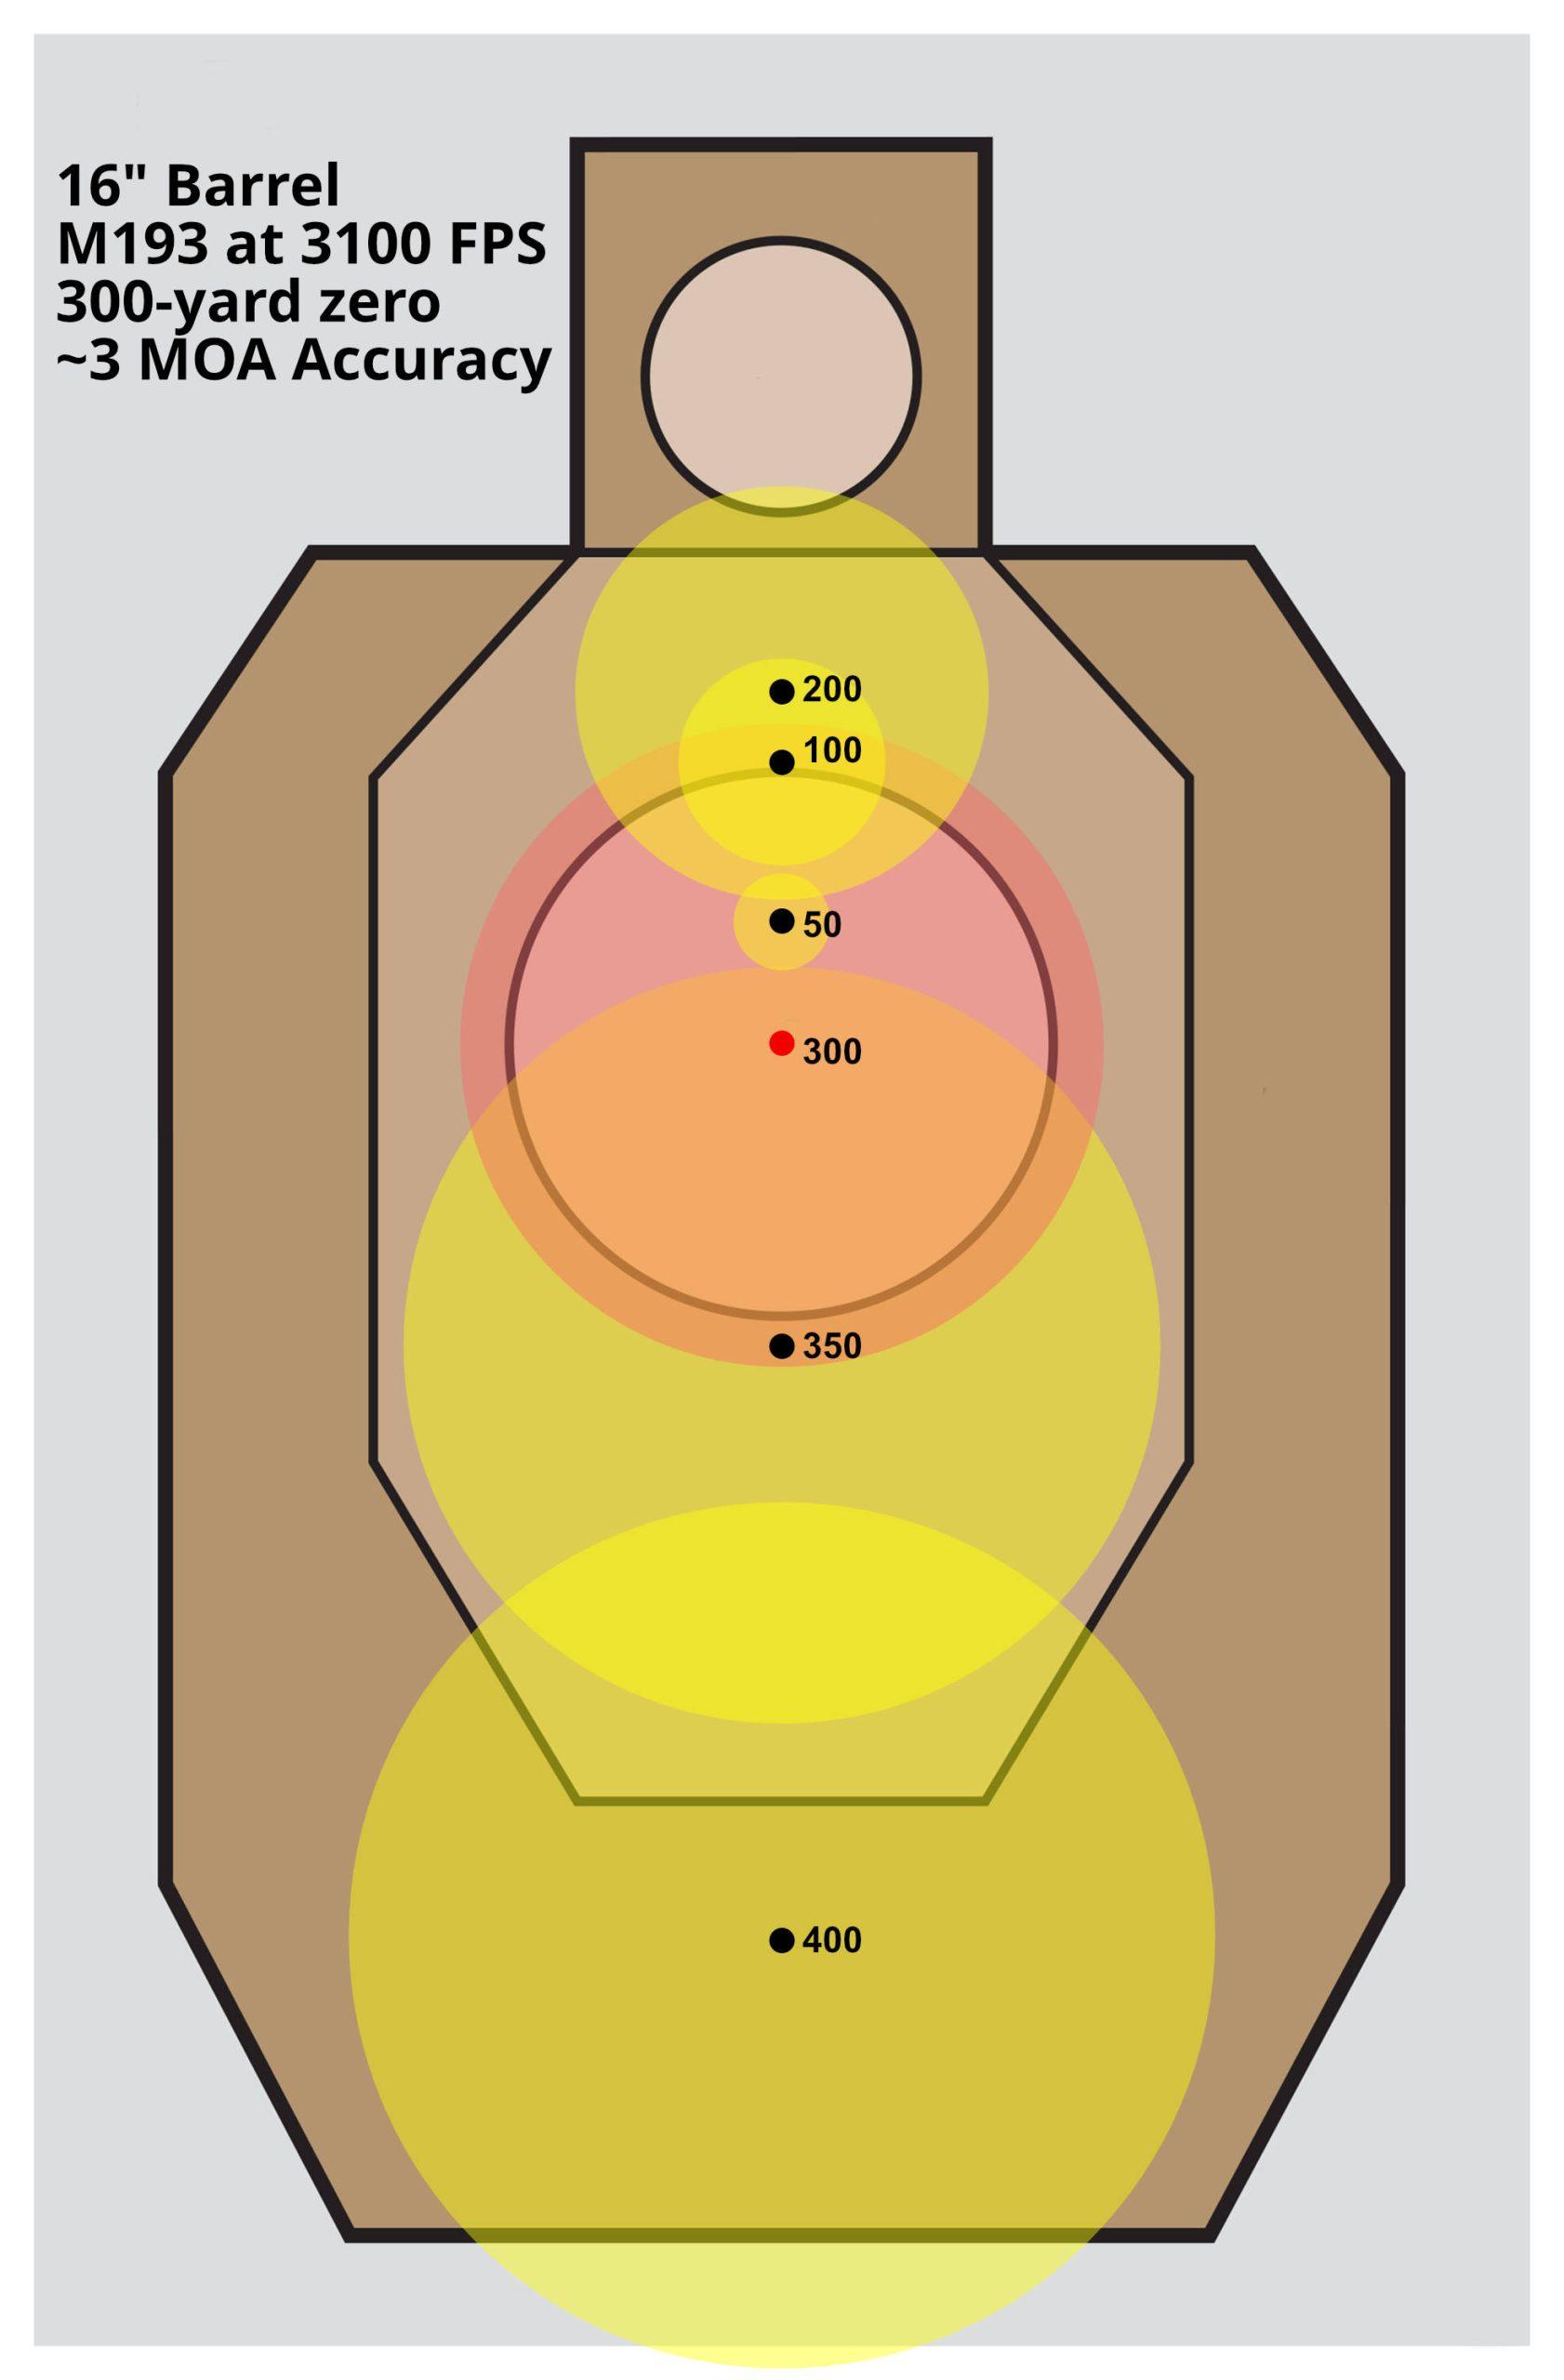
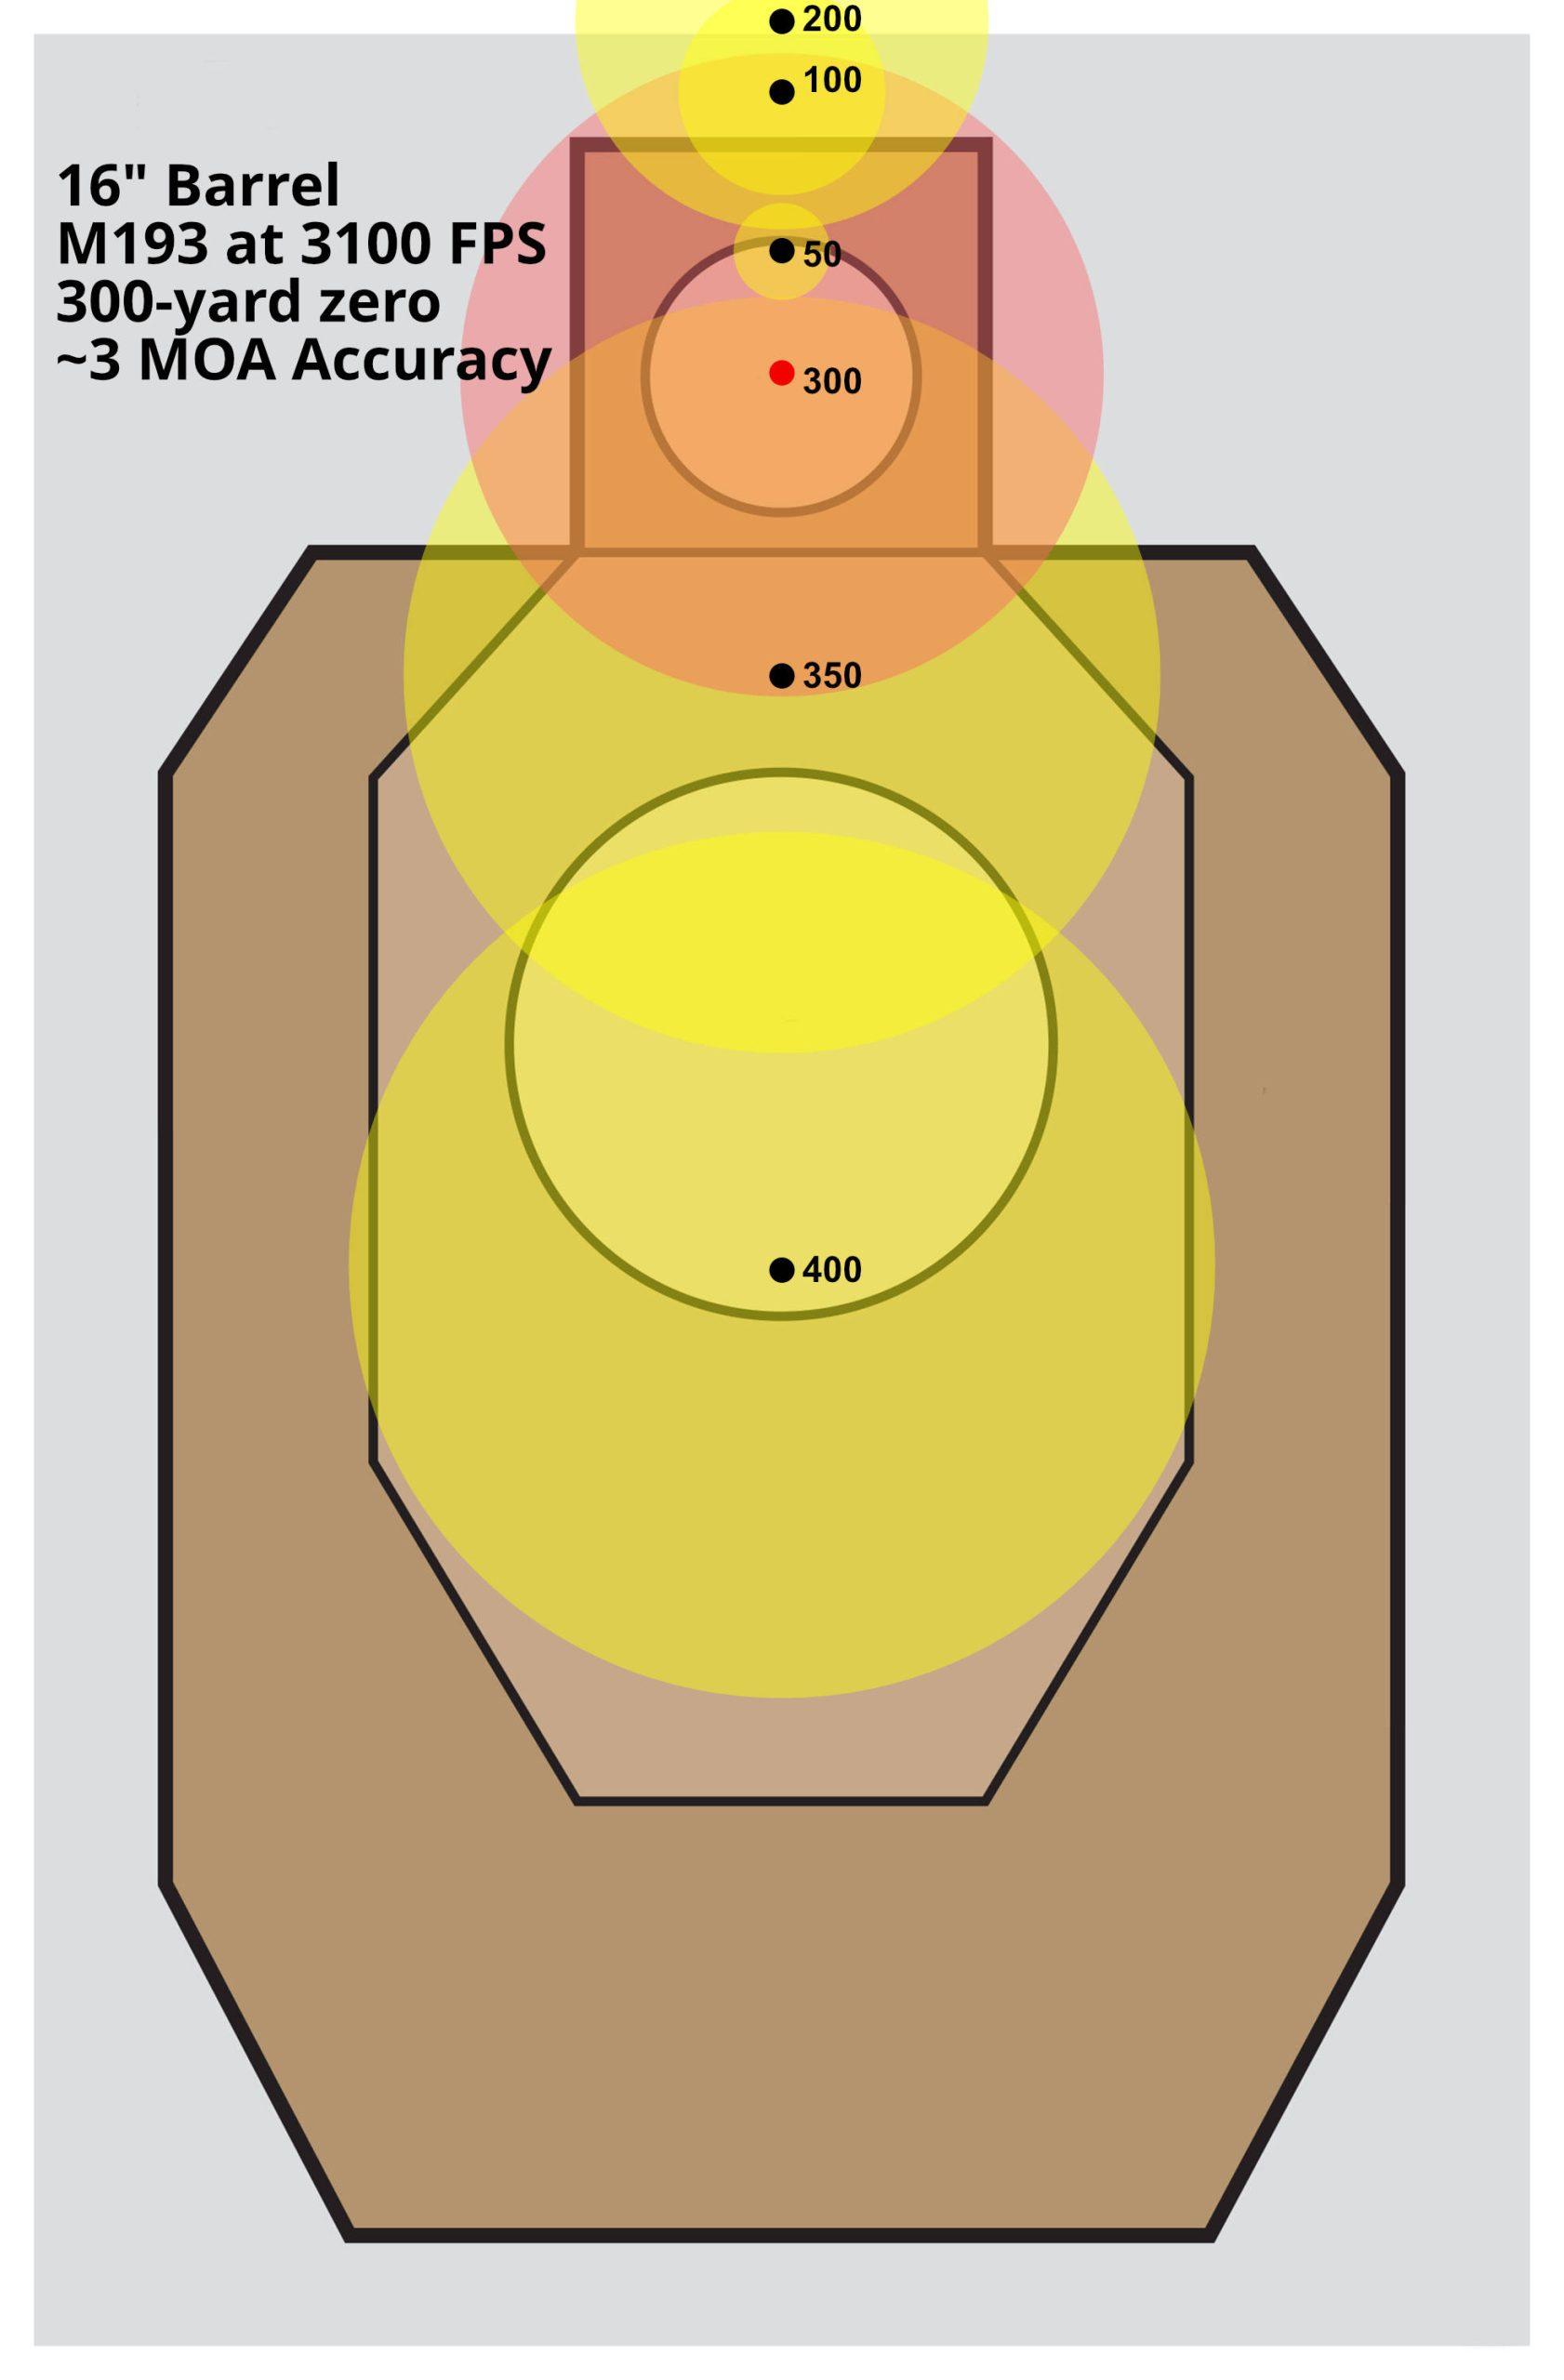
To see how velocity affects MPBR, I made this little graphic. It shows three barrel lengths all zeroed for 300 meters with 55gr M193. The red dot represents the mechanical zero and the black dots indicate impact points at other distances.

Using this data, it’s easy to see why the Army and Marines were drawn to the 300-meter zero as their “do-all” for so long. However, one challenging aspect of this battlesight zero is the maximum ordinate.
With this zero, the bullet will be about 6 inches above the line of sight at 161 yards. If you want to hit a small target, such as a small gong or a headshot, then aiming center mass of that target means your shot might go over the target entirely. Keep in mind that that 161 yards is a far more likely distance to engage a target than 300 yards, so you’re effectively making things harder on yourself when engaging targets at the distances you’re most likely to need to shoot them.
If your target is smaller, then you need to adjust your radius and zero to compensate.
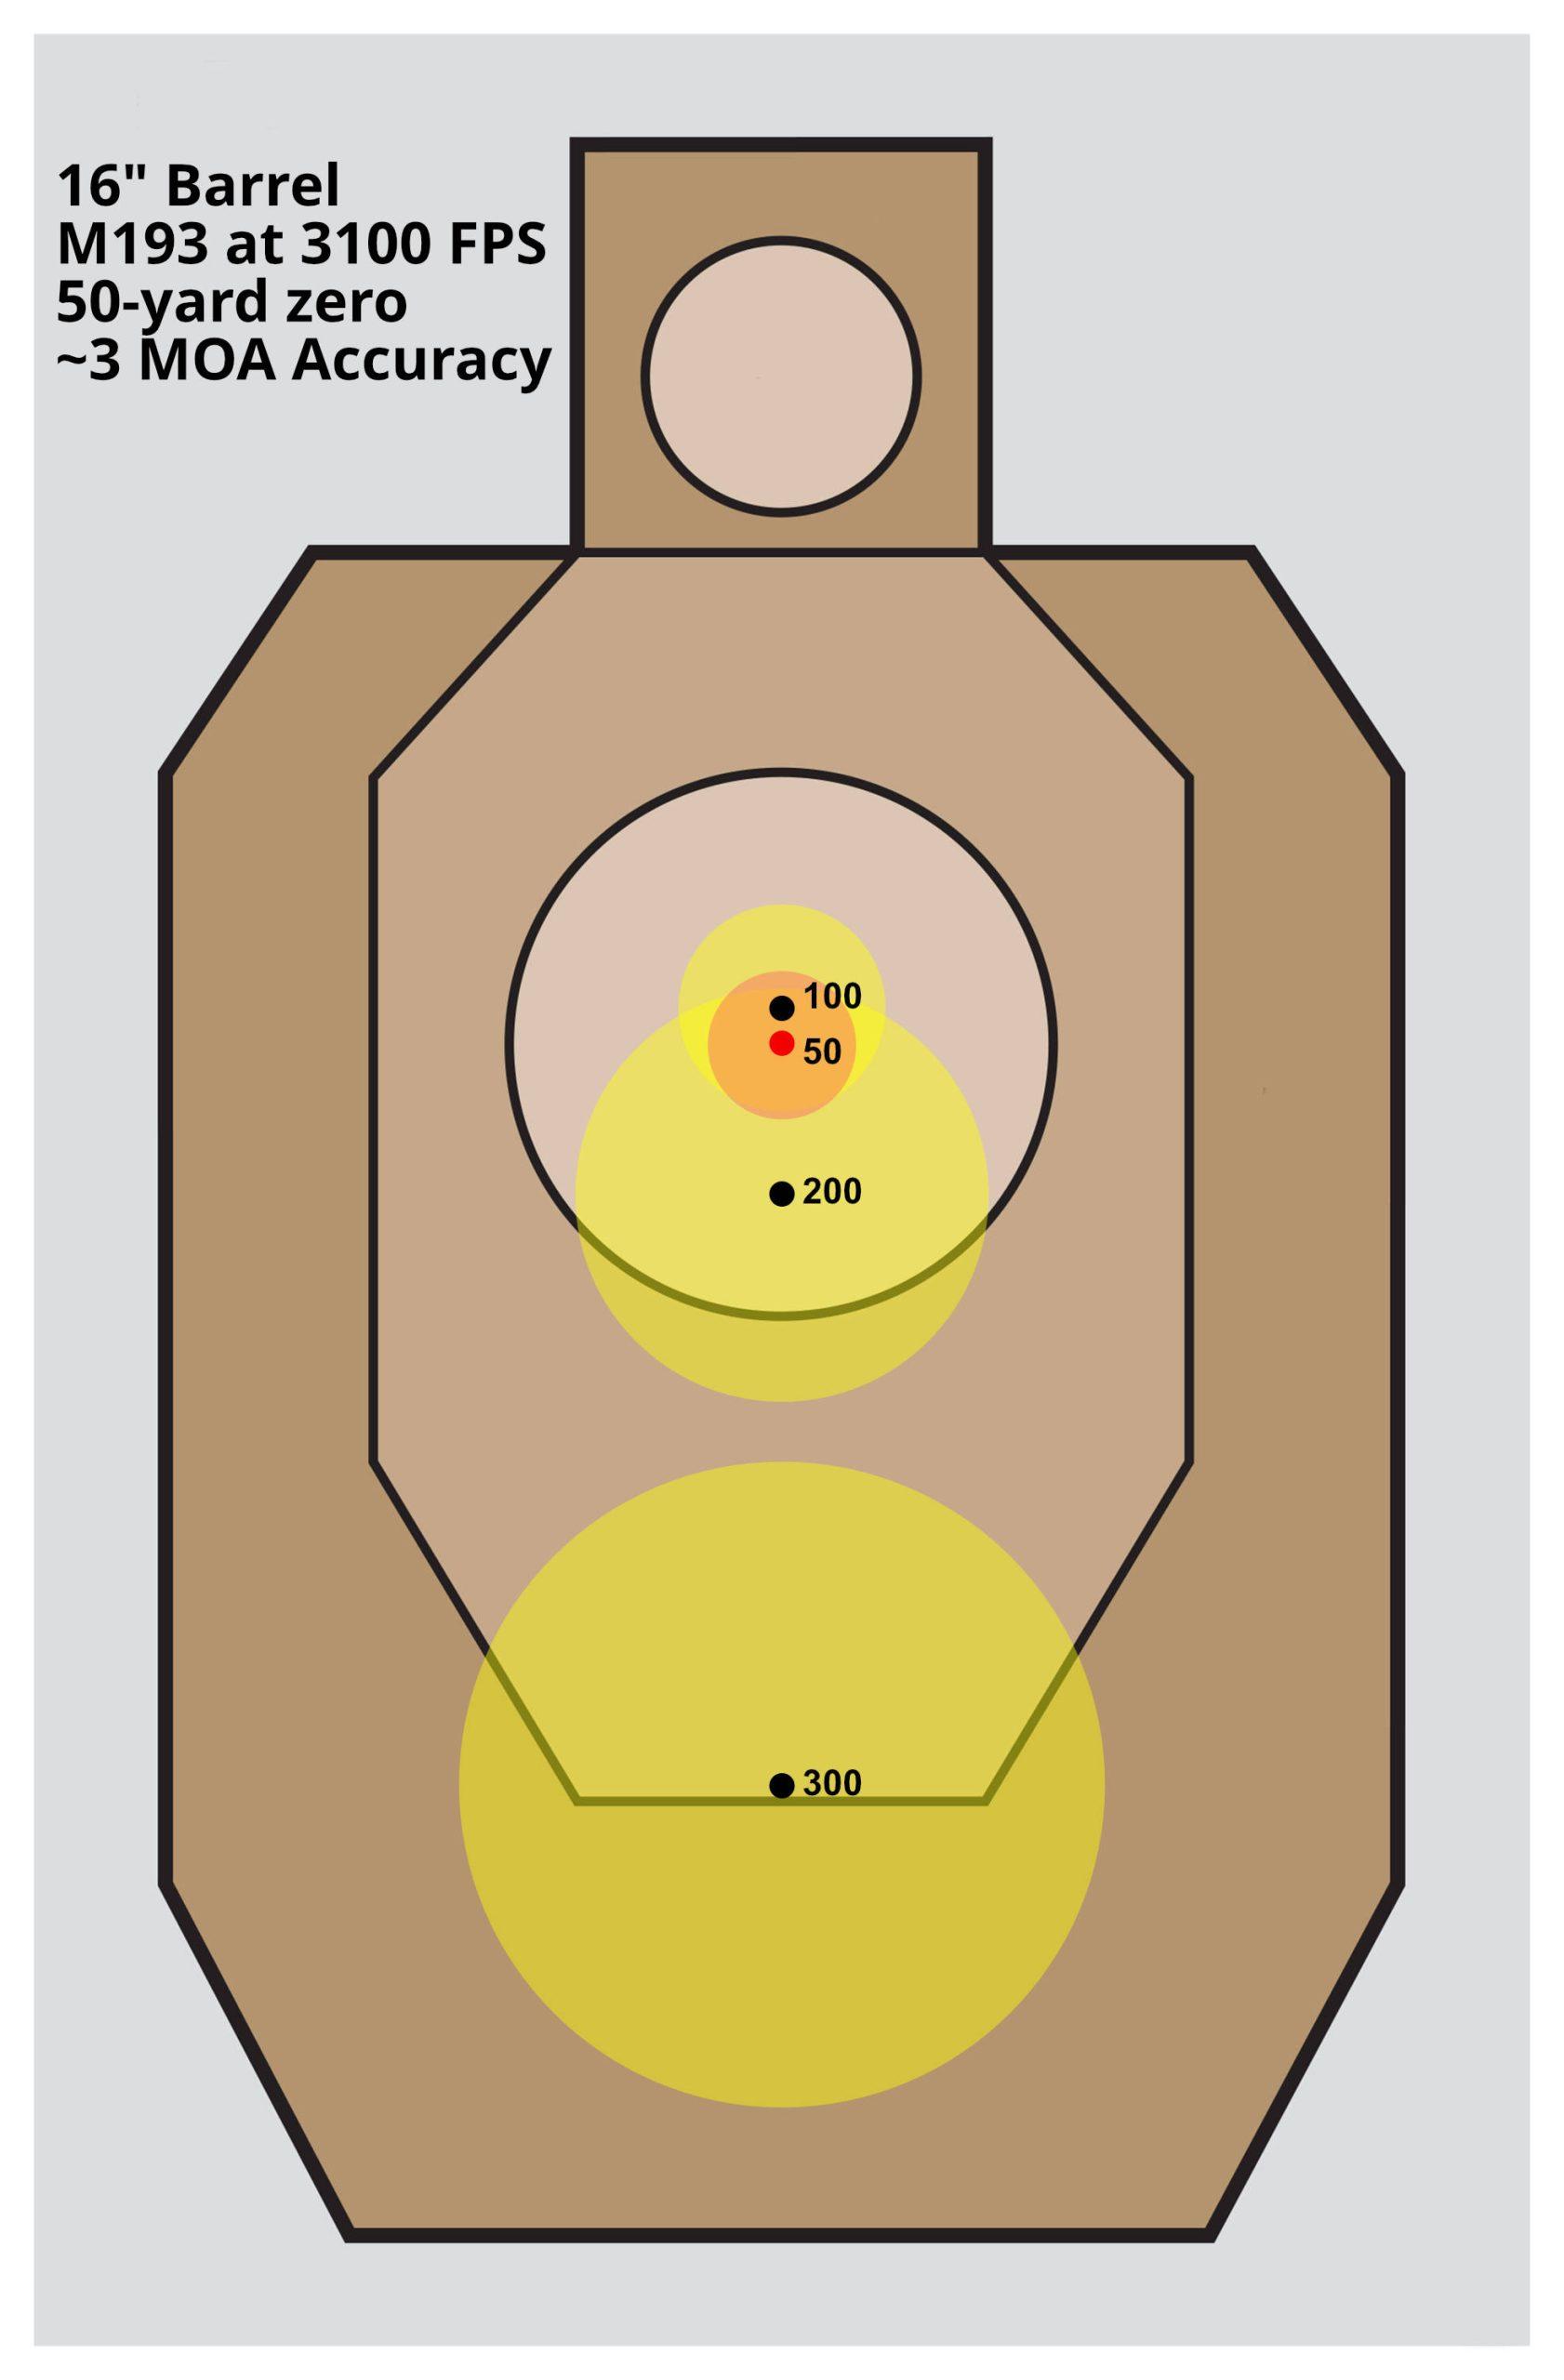
This is the reason for the common 50/200 zero. A lot of military trainers noticed that soldiers tended to miss high during engagements with the 300- meter zero. The 50/200 keeps the bullet trajectory within +/- 2 inches of the line of sight until about 250 yards.
Theoretically.
I made a similar chart for that zero as well.

Note that the cluster of shots is significantly tighter here, but that comes at the expense of the 400 meter impact falling off the target completely. The lesson here is that you need to know your realistic envelope for engagement and plan for it.
Just for fun, I ran the numbers through JBM for my 20″ rifle and a 2″ radius vital zone (for a total of 4″ vital zone circle). The result is a point blank zero of 194 yards and a maximum point blank range of 226 yards. I highlighted that in yellow.
The red highlight shows the numbers for a 200-yard zero. For practical purposes, this 200-yard zero is way more useful at realistic engagement distances.

Near and Far Intersection
Remember that your zero is the the point where the ballistic arc of the bullet intersects your point of aim. For just about every zero distance outside of 100 meters, there are actually two points where the bullet crosses your line of sight.
In the above chart, for about a 200-yard point blank zero, you’ll notice that the bullet starts 1.5″ low at the muzzle. That’s because of the sight offset, where the rifle’s sights sit 1.5″ above the bore of the rifle. Because of the launch angle on our way to a 200-yard impact, you’ll notice that the first intersection of the bullet and line of sight happens around 30 yards. Of note, 1.5″ height over bore is arbitrary here. Your actual sights are likely higher, in the 2.5″ to 3.0 range”. My numbers are for illustration purposes.
The trajectory’s apogee happens around 115 yards, and then the bullet arcs downward again to reach the second intersection at 200 yards.
This is where people get the idea of 50/200 or 36/300-zeroes. They’re trying to define the near and far intersections as a way of saying that if you zero at 50 yards, then you’ll also be on at 200.
Well, as all of these charts should illustrate, that’s not true. The curve depends a lot on the ballistic characteristics of the bullet as well as the velocity it’s traveling. You can get close, even just a few tenths of an inch away, but close isn’t a zero.
So never assume that you’re “good to go” with multiple zeroes. Your zero is the distance you’ve actually verified at. If you want to zero at 25 yards, then fine, but don’t think you’re also zeroed at 300 until you actually test your rifle at 300.
Similarly, a 50/200 is not going to be dead on at both 50 and 200. Of those two, I’d say it’s better to actually zero at 200.

Applying Point Blank Zero to Optics
With enough practice, you will learn your MPBR well. You’ll begin to recognize situations where you can just “hold center” vs dial your sights.
Point blank zero works particularly well for red dot sights or magnified scopes with standard duplex crosshairs. But what about other reticle designs? You can combine point blank zero with different reticle shapes to determine more aiming points as well.
For instance, my Trijicon TR24G has a glowing triangle sitting atop a post. However, the heavy post prevents me from using holdovers beyond the bottom edge of the triangle According to Trijicon, this triangle is 4.2 MOA tall at 4x magnification. Since it is second focal plane, it is 12.8 MOA at 1x, and 8.4 MOA at 2x magnification.
JBM does not produce a point blank zero based on minutes of angle. But it does still produce MOA drop values.
You’ll need to play with the distances until you arrive at an acceptable solution.
If I wanted to keep my impacts to 4.2 MOA above or below the tip of the triangle, then a 275-yard zero works best. Rounding up to a 300-yard zero with the tip of the triangle means that the bottom of the triangle is at about 410 yards.
If I zoom down to 2x, the bottom of the triangle is now 8.4 MOA from the tip, which correlates to a 500-yard aim point. At 1x, that same point now gives about a 600-yard aim point.
That is, of course, assuming you can even see the target.
This method works reasonably well for any optic. If you happen to have a BDC or any reticle that provides solid holdover points, then you might use that method instead.
Multiple Aiming Points
There is another technique related to the point blank zero but isn’t quite the same thing. The Swiss developed a method of aiming at the belt line or the neck depending on the estimated range to the target.
They use a 300-meter zero. If the target is “close,” then the shooters aims for the belt. With that aiming point, any missed shots will hit higher, and hit center mass.
If the target is “far,” then the shooter aims at the neck. Shots will fall low and also into center mass.
This technique is Sniping 4th Generation, and it’s used to teach recruits in a single day how to reach an 80% effective hit rate out to 600 meters. If you’re interested in learning more, you can read my write up on the technique.
The Counter Argument: Why None of this Might Actually Matter
The tricky part about this conversation so far is that we’ve looked at the math. The math makes sense when you account strictly for the zero distance, the velocity of the bullet, and the ballistic coefficient. That’s what prints those nice neat little black dots on the target.
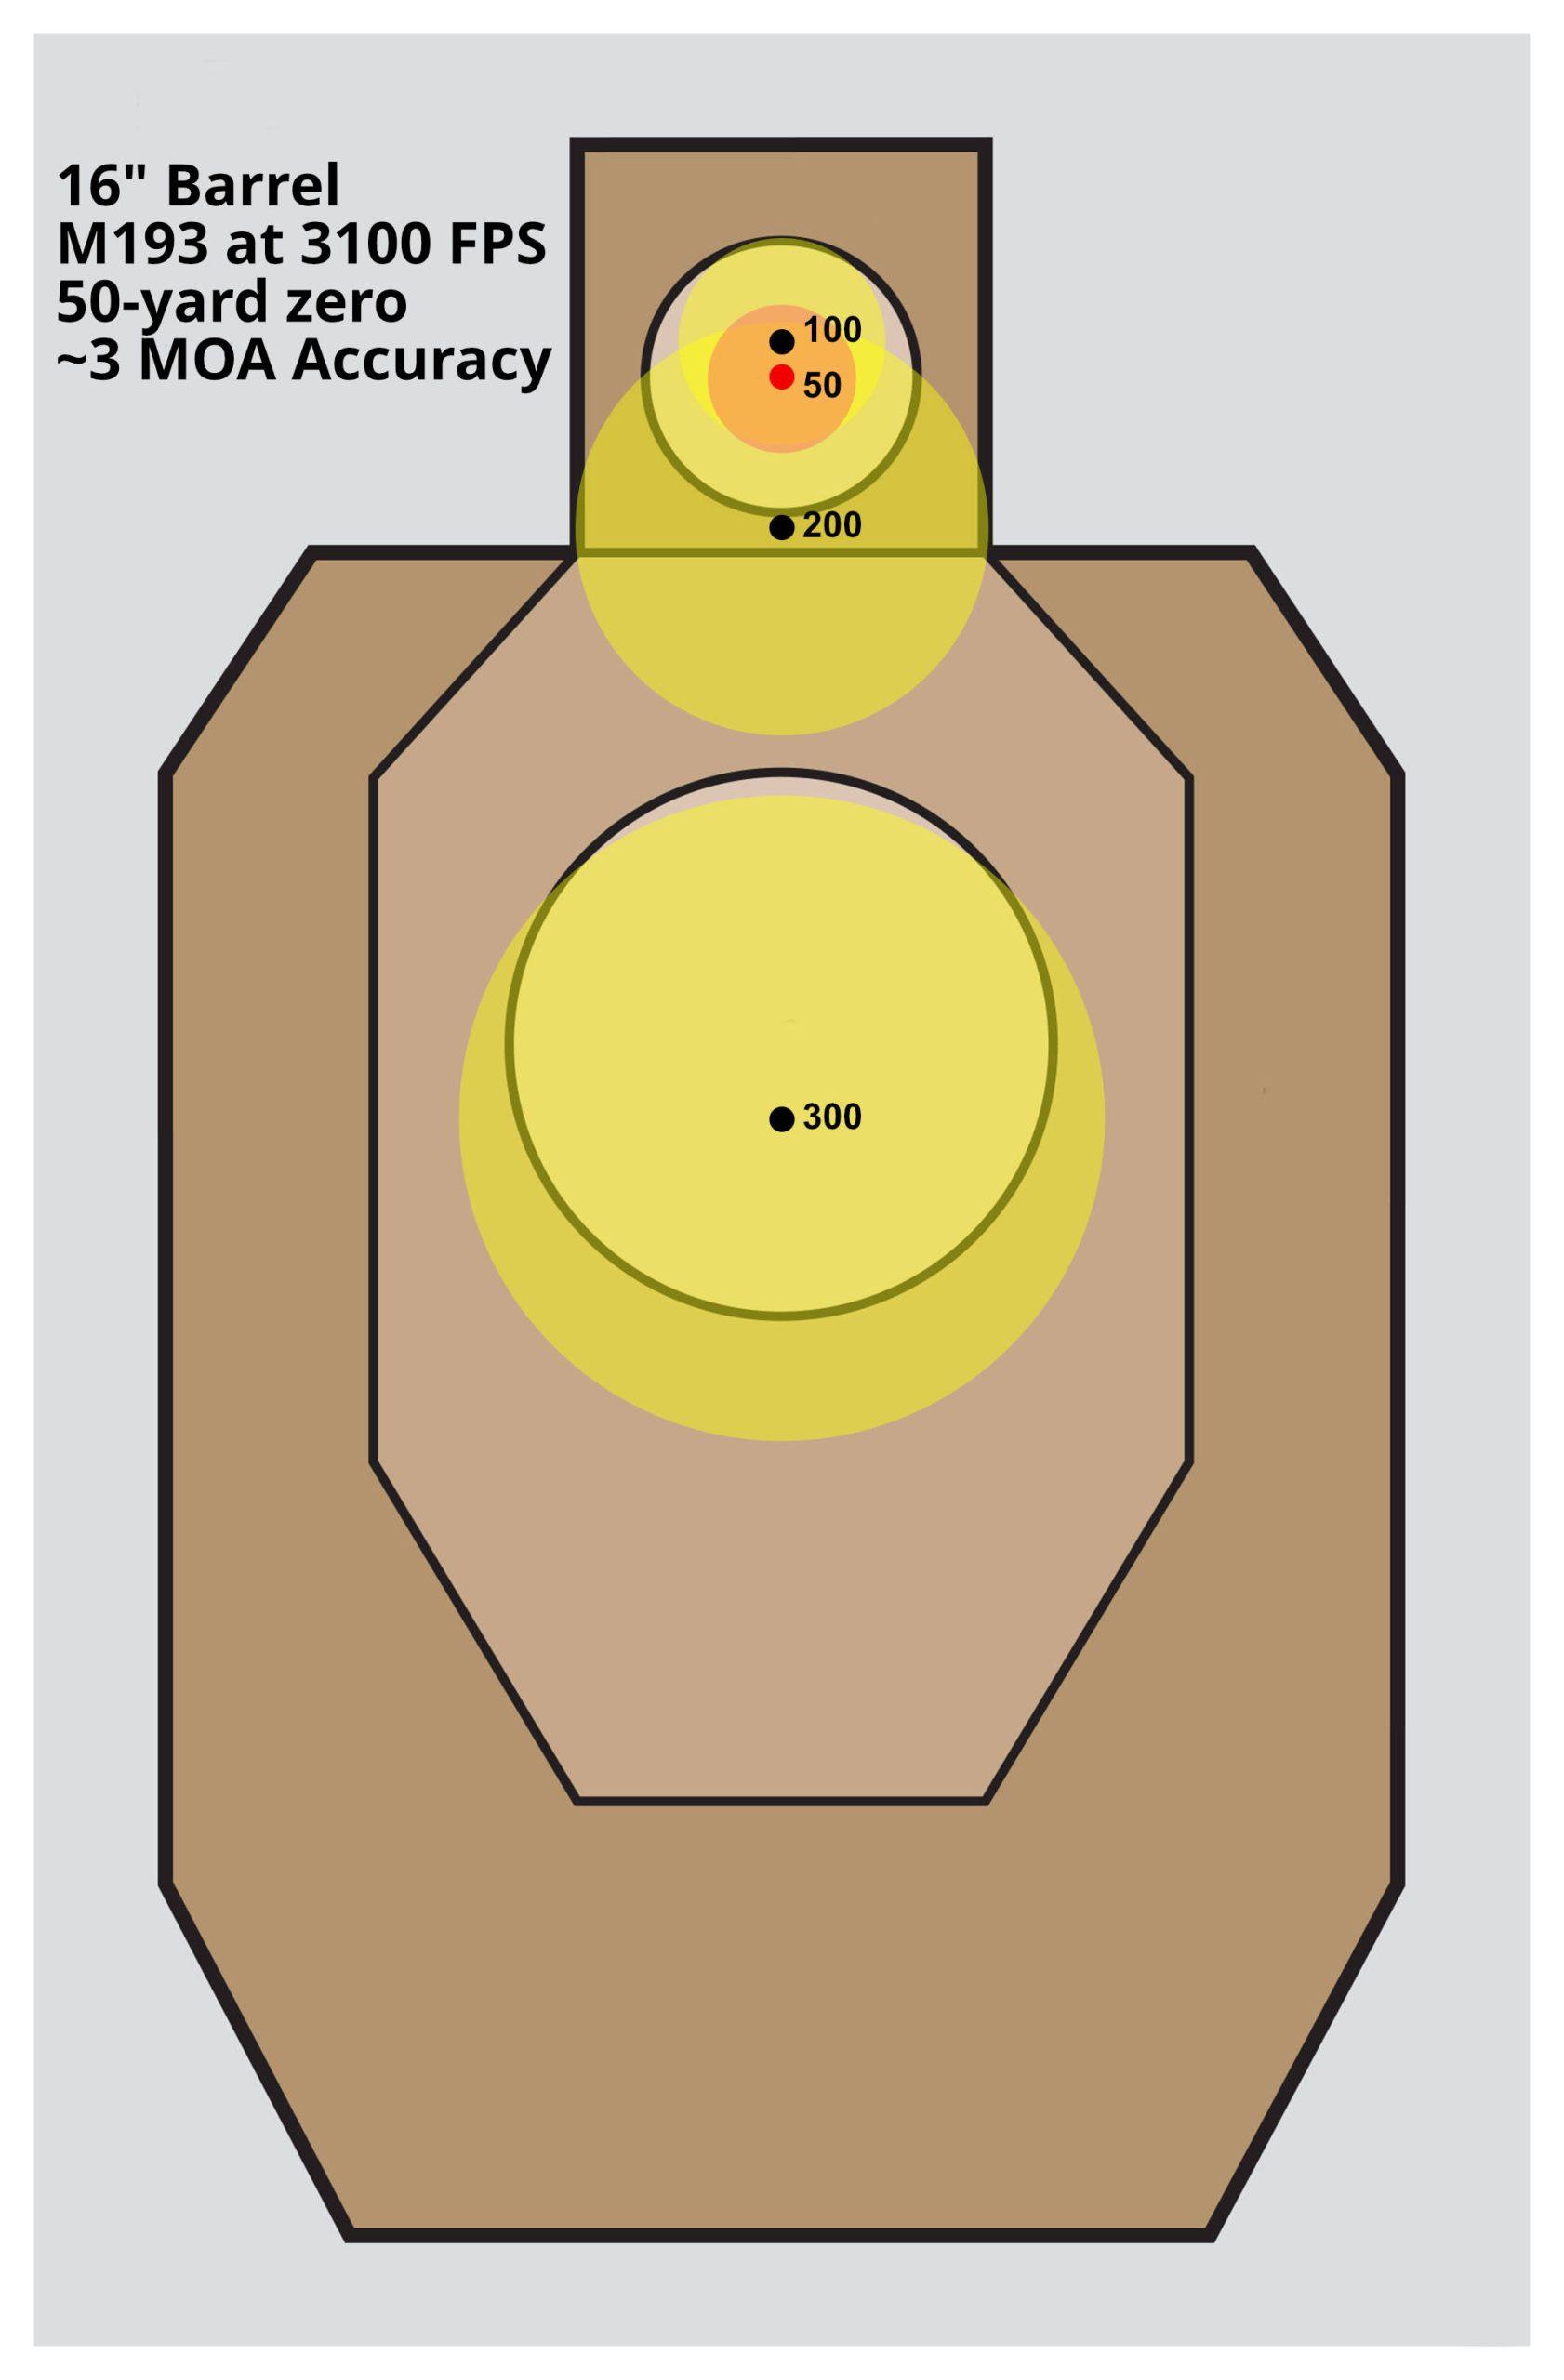
However, in the real world, we do not have perfect accuracy where the bullet goes into the same exact hole every time. We also have to consider the mechanical accuracy potential of the rifle, the ammunition, and the ability of the shooter themselves. To illustrate this, I rendered new versions of the targets from before, but overlayed circular error zones on top of each impact point. This zone represents 3 MOA at each distance, meaning 3″ at 100 yards, 6″ at 200, and 9″ at 300.
Why 3 MOA? This goes back to our accuracy expectation of hitting a 10″ target at 300 yards: about 3 MOA.
As before, the red dot is the actual zeroing point, and I’ve tinted that error zone as red.

The takeaway here is that when you actually start accounting for the accuracy potential of the rifle and shooter, the error zones start to overlap. Trying to suss out the “perfect” point blank zero becomes a mathematical exercise more than having any practical value as a shooter. The nuanced difference between a 100 yard or a 50 yard (with 200 being very similar) is really not all that useful.
With the 300-yard zero, in particular, the potential to miss a target when aiming at the head or some smaller exposed area at closer ranges becomes much worse.
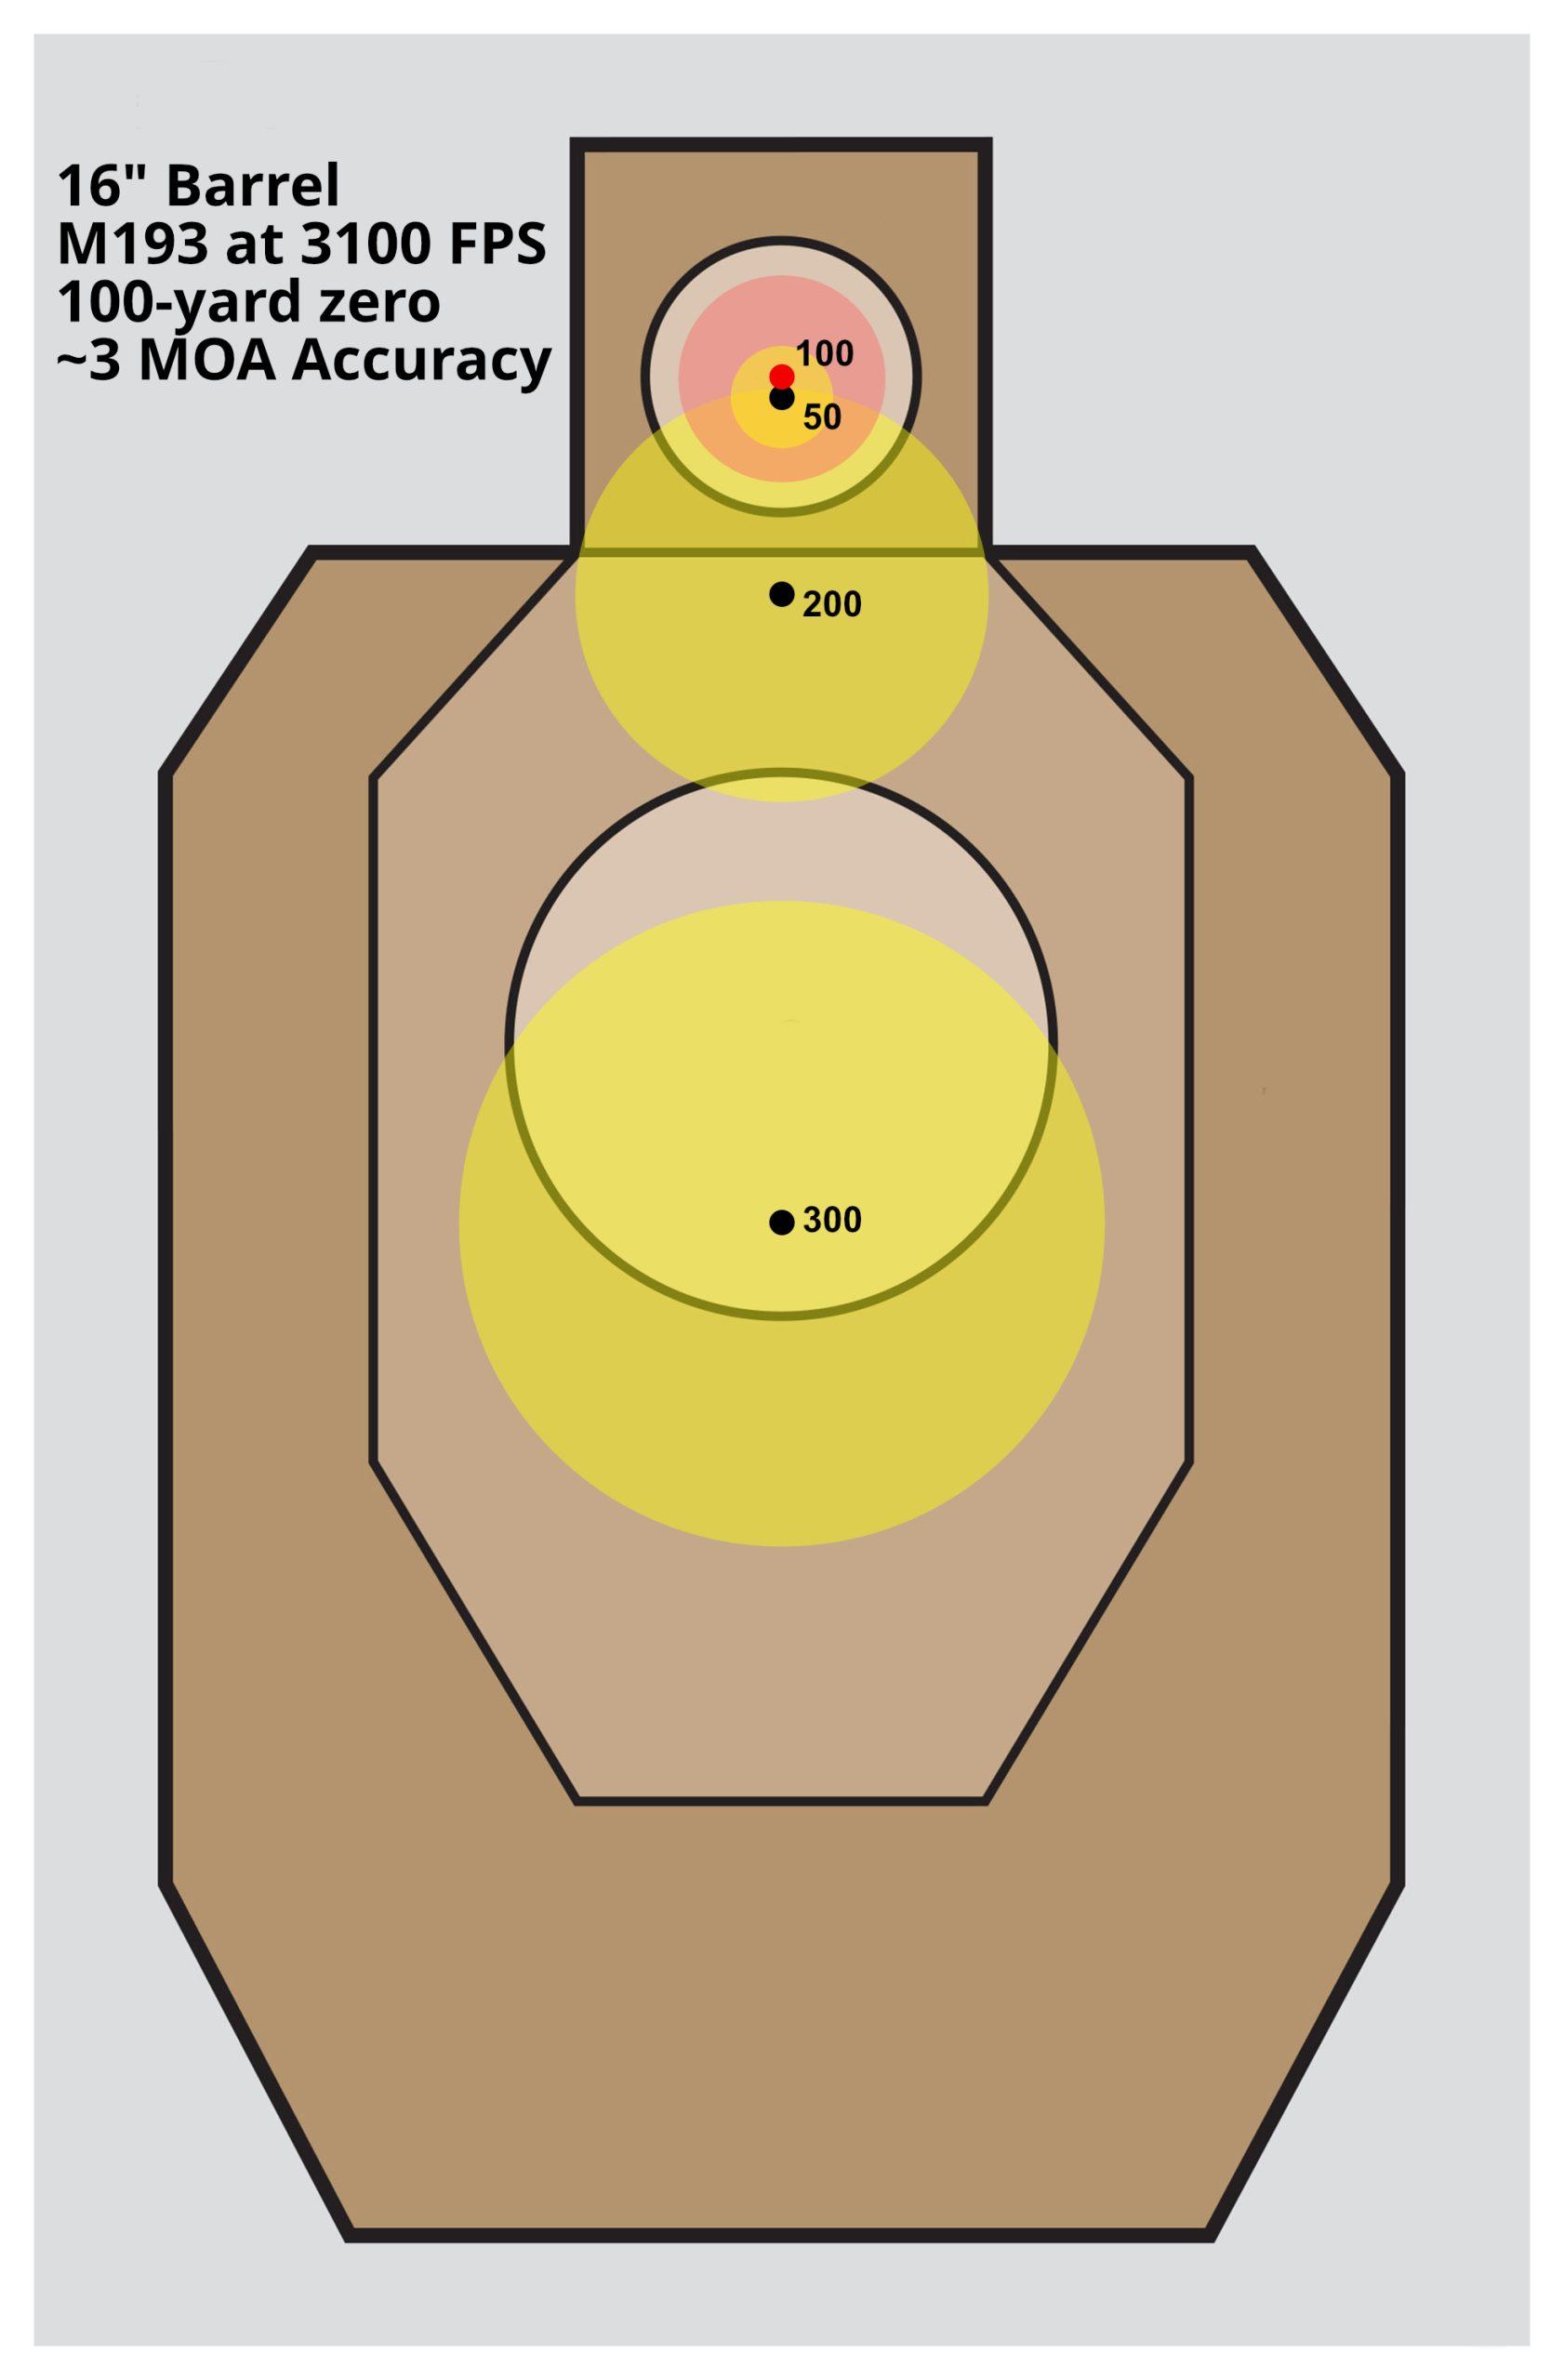
The Zen of the 100-Yard Zero
Now we get to my “just do this” advice.
These targets illustrate an important lesson. There is value in keeping things simple. With a 100-yard zero, shots taken any closer or further always impact lower than the sights are zeroed for. In practice, that means that you only ever have to hold higher on the target. If the target is relatively close, say 0-200 yards, then hold center mass and your 100-yard zero will more than likely place it within the 10″ circle.
If the target is far (say 200+ yards), then aim at the upper chest or head and the shots will fall down into the vital zone anyway.
Simple.
Why Accuracy Matters
To illustrate one more concept, let’s talk about the accuracy standard. I did these charts with a 3 MOA standard in mind. That sounds simple, in theory, but if you aren’t able to consistently keep your hits within the 4″ 9 ring of a TQ-4 target during the basic rifle marksmanship course of fire and scoring 270/300, then you aren’t even at a 3 MOA standard, yet.
Let’s say someone is an 8 MOA shooter, which would keep them within the 8″ black of the TQ-4 at 100 yards (the 7-ring). Here’s what their target looks like when they try to apply a 50-yard point blank zero.
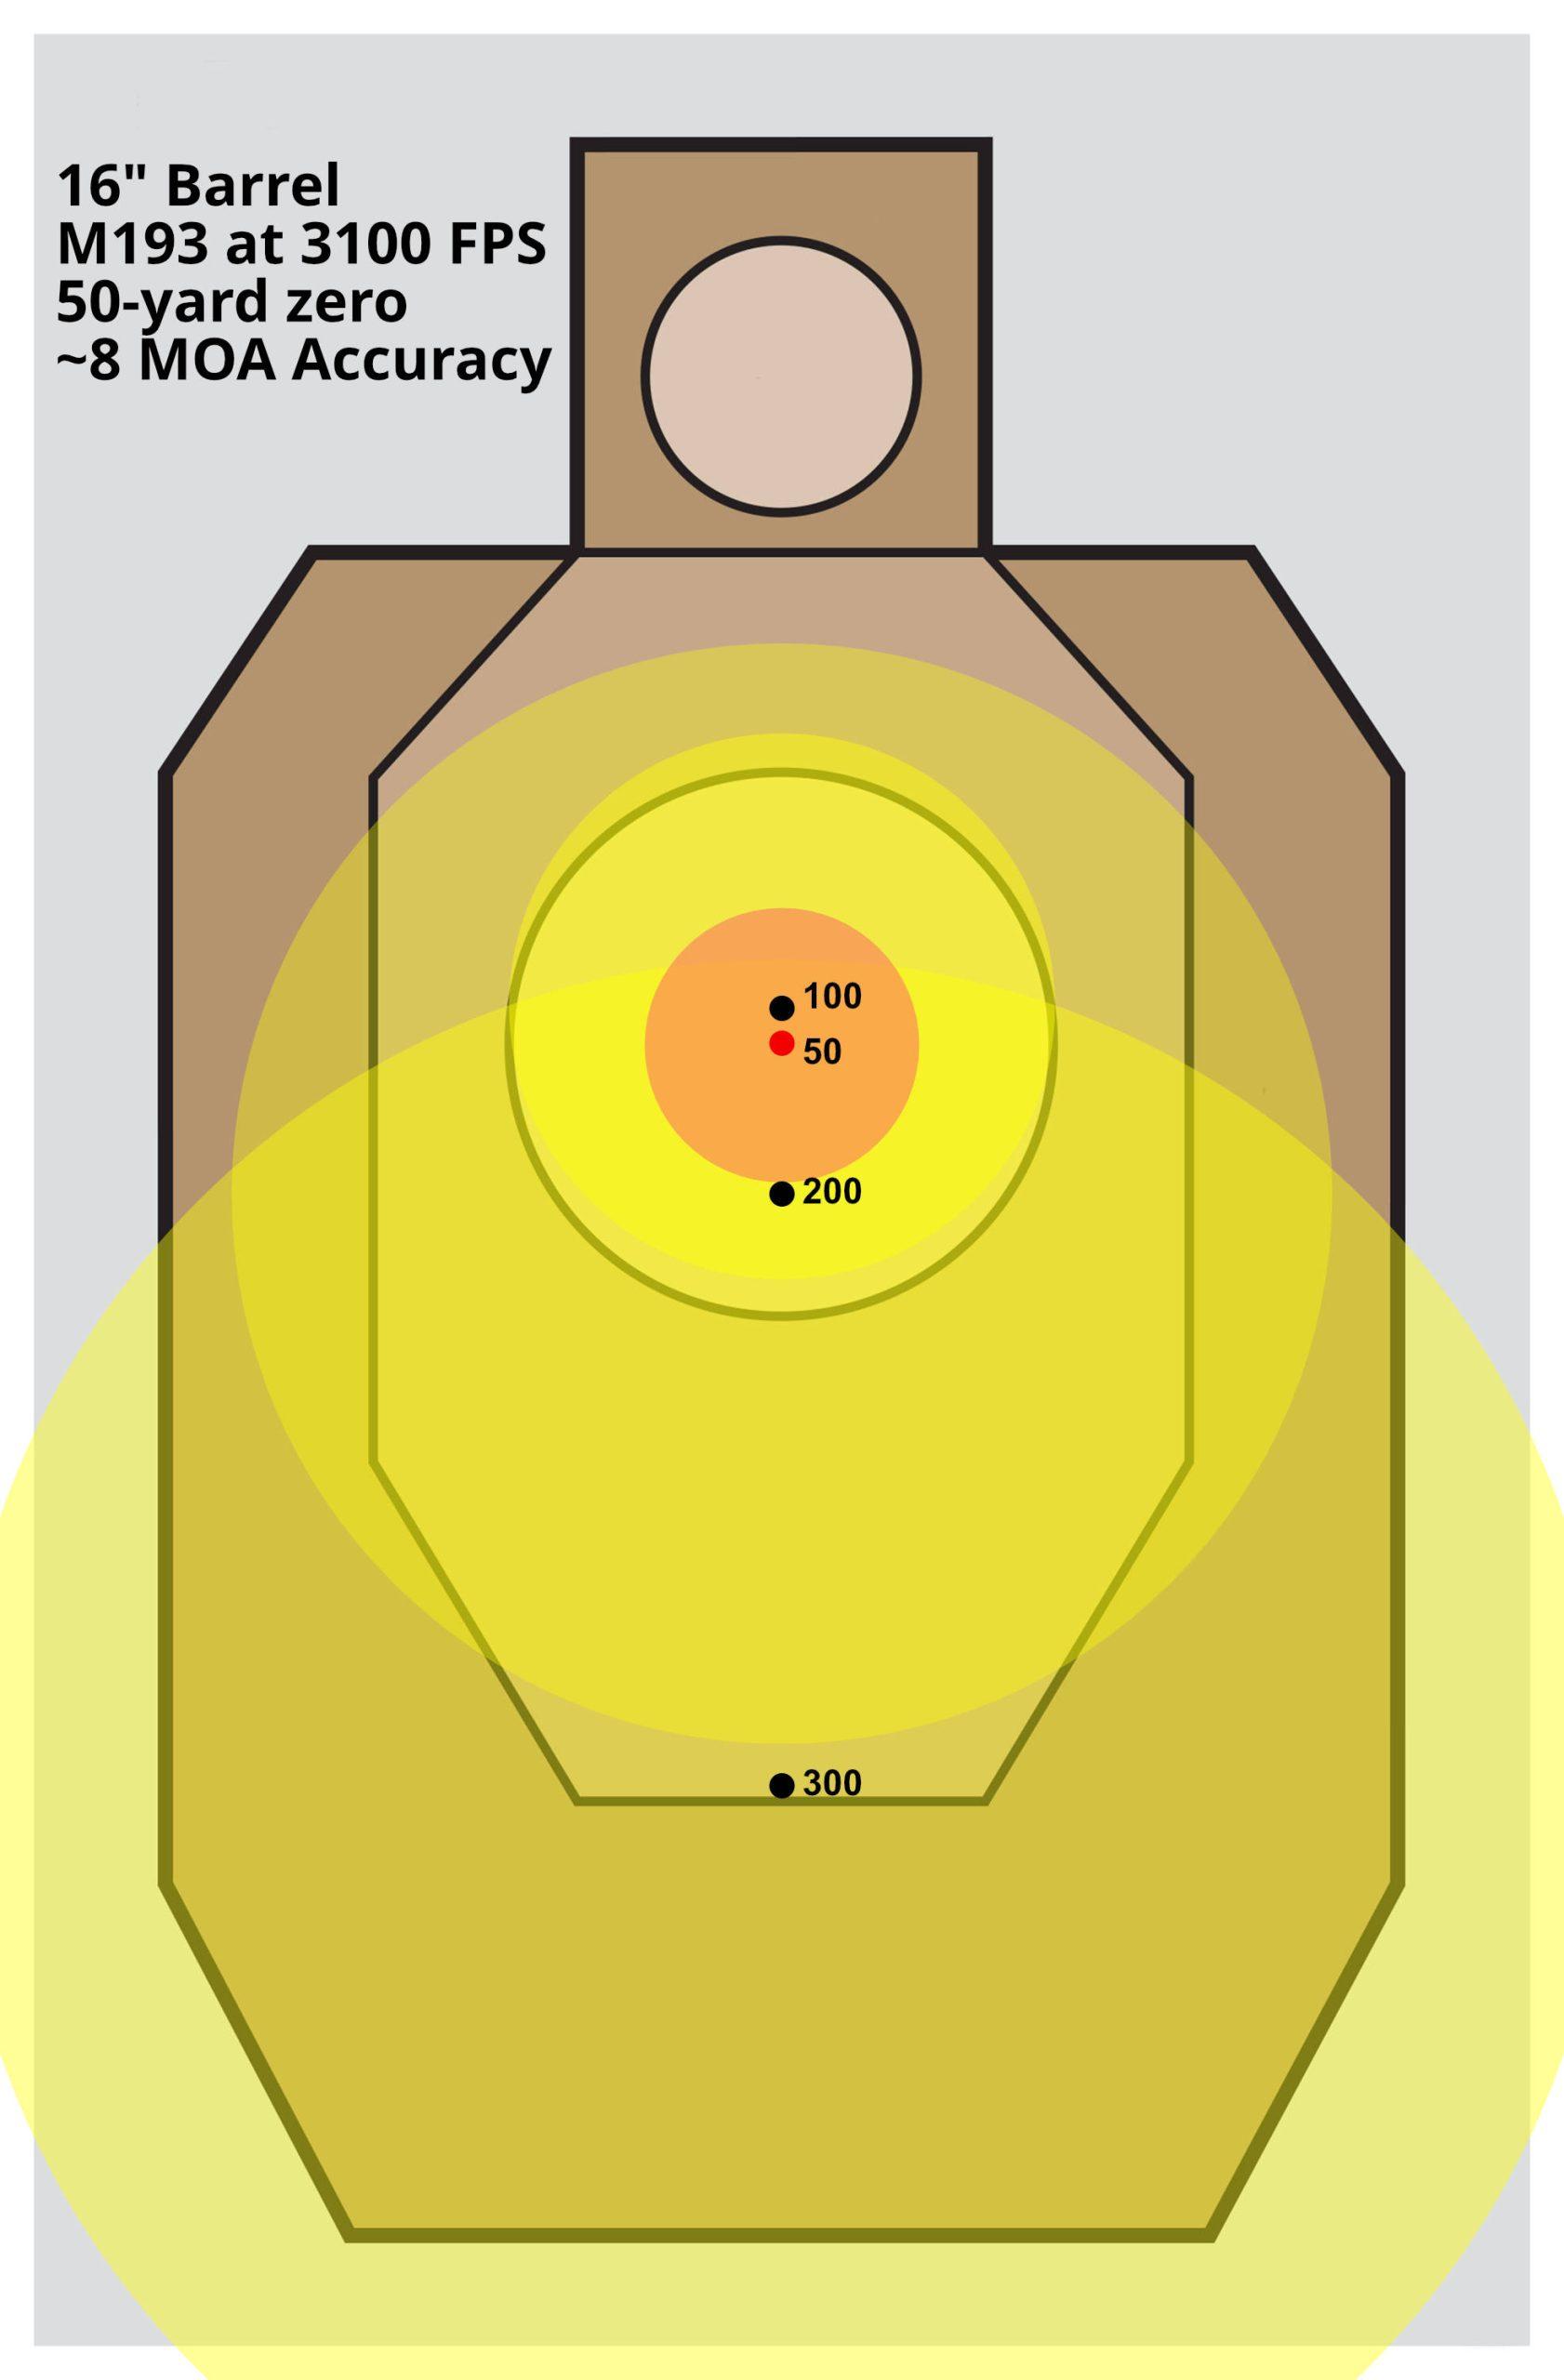
Out to 100 yards, it’s still serviceable marksmanship. But as you get out to 200 yards, it’s a 16″ error zone that might hit the target if it’s a full width one facing the shooter, or it could completely miss if the target was turned sideways presenting only the 10″ sternum-to-spine distance.
At 300 yards, it’s a crap shoot.
This is why accuracy matters, and you need to not only have a combination of rifle and ammunition that’s up for the task, but also a shooter with the ability to shoot up to the level of that rifle and ammunition.
Wrapping Up
In the end, you have to imagine two opposing ends of a line. On one end is speed, and on the other is precision.
Which is more important to you for the most likely shot you are going to take?
Point blank zeroes work great for hunting or self-defense inside 200 yards on fairly large target zones assuming you have a weapon and shooter that’s accurate enough to take advantage of it. If you need to hit small targets at longer ranges, then you might need to shift more towards precision-oriented zeroing methods and optics.
While the point blank zero is mathematically interesting, most shooters are better off just keeping it simple with a 100-yard rifle zero if they have a place to do that. Otherwise, 50 yards is also usable and has most of the same benefits.
It’s also a matter of practicality. It’s easy for someone like me to say you should zero your sight at 200 yards, but most readers are unlikely to have convenient access to a 200-yard zeroing range. I certainly don’t. Both 100 yards and 50 yards are far more common, and work perfectly well on their own.


“… and it’s used to teach recruits in a single day how to reach an 80% effective hit rate out to 600 meters.” This sentence fragment, by itself, wraps up the entire point-blank-zero philosophy in a nutshell.
It’s funny, I was having an email exchange about that very idea. Be careful about associating PBZ/PBR too closely with S4G.
S4G has a very large vital zone, a whole human torso standing in the open, and multiple aiming points. It’s definitely a military tactic for massing effective fire than a precision marksmanship tool.
A good PBZ/PBR is going to have a much smaller vital zone, and therefore be usable in a much smaller range window (250-350 meters).
Well done sir!
Thanks, Pete! I really appreciate the insight you’ve given.
As an armorer, you should be able to help a customer zero his or her iron sights or scope
One thing I haven’t seen in many discussions about MPBR is including the effects of your system’s precision. I believe this is a contributing factor toward the 50/200 zero. Even though an animal’s vitals might be 8 inches, your system might only shoot to 2 MOA. If you want to keep everything within the vitals, you need to reduce that size to compensate (or do the detailed math).
It would be interesting to see a 4 MOA dot at each of the ranges on your target plots. This would illustrate what is actually happening, especially at longer ranges like 600 yards.
Forgive me if I missed that in the above discussion.
I’ve been inspired to make a plot based on the S4G concepts, give me a week or so to get that going.
That’s a great point, honestly. All of the math accounts for “perfect” accuracy. But the margins for error change a lot when you start factoring in the rifle, ammunition, and skill of the shooter.
Fix MBPR to MPBR (Maximum Point Blank Range). Nice article though.
Hah, thanks for the catch, Ivan.
Great article Matt! The illustrations really helped visualize the math. Glad Ivan caught the ‘MBPR’ – was a tad confusing. It was the only thing I didn’t understand (thought it might be a missile target term) but knew your intent! Really well done – thanks!
Sir,
Outstanding articles. I’m a retired Marine (aviation type) and was never a good shooter. At age 60 I just bought a LWRC M6A2 and for the life of me, I can’t figure out how to achieve a mechanical zero on it as it’s sites are different from the M16 A2 I used in the Corps. In any event, my goal is to properly align the irons in order to install / co-witness an EOTECH to help my aging eyes. I was initially trained on the 36 yard BZO in the Corps but after reading your articles I’m no longer sure that is what I need. No longer will I be engaging targets beyond 300 yards, rather I see urban conflicts and CQG distances as a more realistic scenario. Having said that, would a Laser Collimator or similar device help me get my weapon zeroed? Also, is the point blank range zero a viable option at this point for me? Thanks in advance, and Semper Fi. Ken Verdoliva, Gunnery Sergeant, USMC (retired)
Hi Ken, thanks for commenting! I can’t say I’m familiar with the M6A2 and the sighting system they put on it. What issue are you having with it?
As far as having the two systems actually match up, I don’t really think that’s necessary. You can actually try two different zeroes all together if you wanted, or just zero them both at 50 meters separately from one another. A laser is probably overkill, though. My technique is to simply start close up and then back off to the range I need my final zero at.
The point blank zero is viable for anyone, really. The 50-meter zero is a really good all-around distance to use for 5.56
Thank you Sir.
I don’t have an issue per se, just confused on so many zero methods. I just want a keep it simple solution that will enable me to be combat effective from zero to 300 yards – that meter stuff confuses me as well 🙂 Now that I’ve hung up my jock-strap and military ID card, I no longer see the need to engage beyond 300 yards.
Semper Fi,
Ken
I’m trying to find ballistic data for zeroing a 12.5 inch barrel in 5.56 with an Eotech HOB 2.26. with 77 grain OTM.
None of the ballistic calculators seem to give an option for barrel length. They also don’t give an ammo option for 77 grain OTM. Should I select the 77 gr HPBT Match King option?
I’m using the JMB calculator. Again, I don’t see an option for barrel length. I’m assuming the data given is for a 20 inch barrel?
I want to make sure I’m getting the correct trajectory data.
I love this article on MPBR! I want to use the data for the MPBR in my zero.
Any help or suggestions would be greatly appreciated!
Thank you!
Hi David, you’re not really going to be able to select a barrel length. Rather, all of these calculations are based on velocity- of which barrel length is a major factor. From a quick search around, Magtech 77gr OTM produces about 2560 FPS from a 12.5″ barrel. That could be a good starting point to plug in your numbers.
Thanks for your response Matt!
Matt, I learned a lot from this article. Appreciate your insight on this subject. Has made me really think about what zeros to use for different rifles, barrel lengths, calibers. My issue is I have limited range distances to use for zeroing. As in, my range has 20, 25, and 100 yard distances only. So If I want to set a 36 yard zero, I would have to calculate the the difference between POI at 20 or 25 yards from POA. Would love to see an article on this if possible.
Hey Rich, thanks for the comment. Seeing as this article was posted 6 years ago, it’s probably due for an update and a refresh. In your situation, I would probably just keep things simple and use a 100 yard zero for centerfire rifles, 25 for rimfire, and 20 for pistol dots/PCCs.
Given the realistic envelope of engagement distances for “real world” scenarios outside of long distance hunting, these zeroing distances are perfectly good ways to go about things.
Makes sense! Thanks for the reply and update to article.