
I’ve dabbled with shooting standards and ideas for years. Be it a mix of drills, tests, or whatever. One example was a series of Martial Marksman rifle standards published back in 2022. More recently, I talked at length about the marksmanship training zones. Both of these were good attempts at formalizing a marksmanship training philosophy. The latter post focusing on the ability to hit a 10″ circle target as quickly as possible out to varying distances with different platforms.
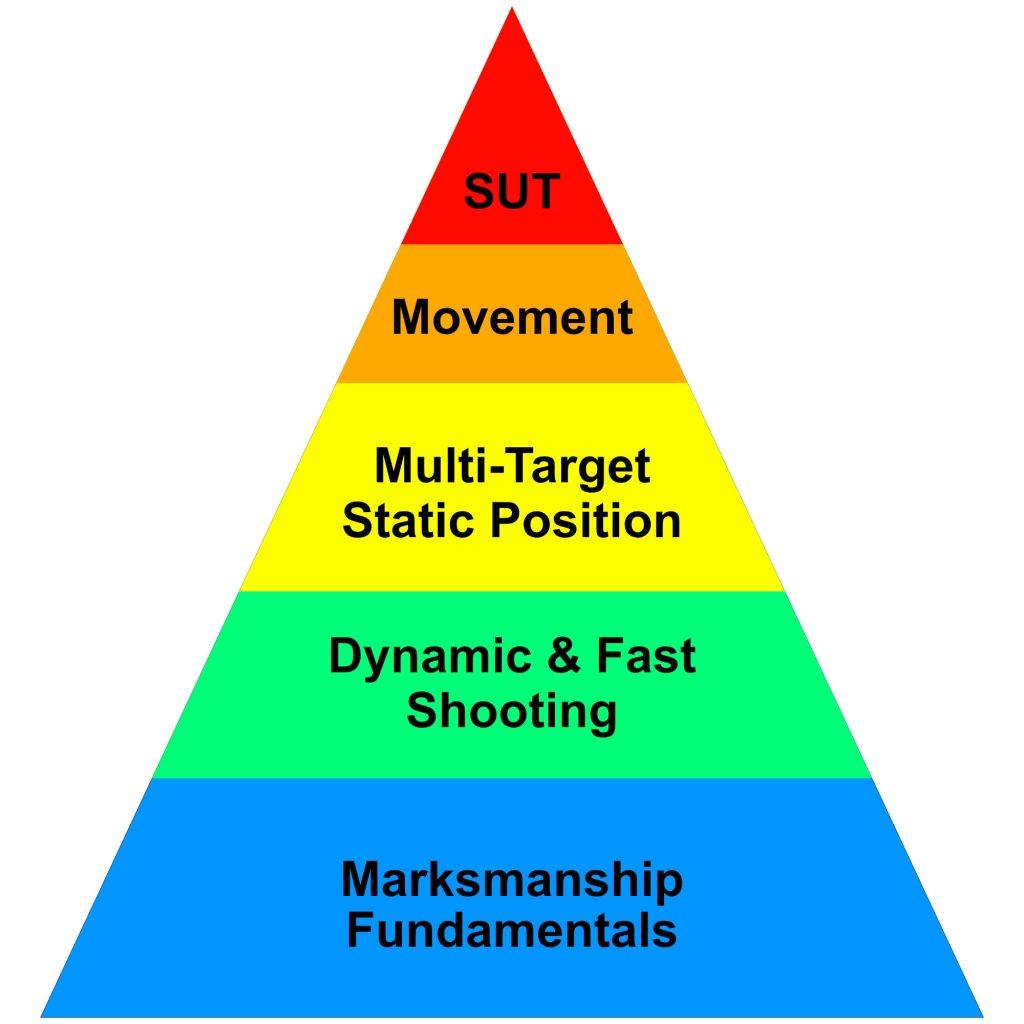
I still felt like something was missing, though. I’m quite fond of my physical fitness hierarchy, as I think it does a good job breaking down what actually provides the foundation for everything else to build on. The bottom three levels (health, foundational strength, and aerobic capacity) are where you should spend the majority of your time. The upper levels are detours and add-ons that you can do for shorter periods of specialization in the run-up to something specific, but they wouldn’t really be possible without the base layers.
I think marksmanship and shooting works the same way. Way back in the 1960’s, Bill Jordan advocated that every shooter should master the fundamentals of marksmanship to a high level before moving on to shooting fast. Every instructor since then has built on the idea.
Building Foundations
Shooting is a perishable skill. It degrades quickly when you aren’t practicing regularly. This is especially true at higher levels. We can call this “ceiling degradation.” You can work to raise your maximum performance, the “ceiling,” but it also fades over time. Conversely, less talked about is the idea that you can raise the “floor.” By that, it means that spending enough time building the foundation gets you to a level of baseline proficiency that never really goes away.
With a solid “floor,” you can quickly build back up to a higher level of skill. For shooting, that “floor” is your basic marksmanship fundamentals. With a solid grasp of those, it won’t take long to improve your speed, weapons manipulation, mechanics, and other areas. So it all starts with the basics.
Let’s dig in.
Level 1: Fundamentals
This level is all about static precision and the core basics of marksmanship: position, sight picture, and trigger control. Every top level shooter I’ve followed and read effectively says the same thing, too. The most basic element of good shooting is managing the trigger so that it doesn’t disrupt the sights.
I can think of no better shooting discipline that works these fundamentals than your basic NRA Bullseye pistol and three-position rifle competitions. Gaining proficiency here sets you up for a lifetime of success. Furthermore, like strength training, there is an absolute level of challenge and discipline required to get really good at the fundamentals. In fact, you will probably never truly master it.
So how do you judge when you’re sufficiently skilled to move on? I’m glad you asked. Here’s the table of suggestions.
Level 1: The Fundamentals (Consolidated Standards)
| Platform | Distance | Target | Pass Score (Max 300) |
|---|---|---|---|
| Pistol | 25 Yards | NRA B-8 | 255 (85%) |
| Rifle / Carbine | 100 Yards | NRA TQ-4 | 240 (80%) |
| PCC | 50 Yards | NRA TQ-4 | 255 (85%) |
| Rimfire (Trainer) | 50 Yards | NRA TQ-4 | 255 (Modified Scoring) |
| Precision Rifle | 100 Yards | NRA TQ-4 | 270 (90%) |
Now let’s talk about how to execute each of these. I’ve based my scoring around the NRA “Sharpshooter” ranking for each of the disciplines, with a few minor adjustments to simplify logistics of target purchasing. Everything uses either a B-8 target or a TQ-4 (which I’ve long advocated as the standard Everyday Marksman training target).
Pistol Shooting
Shoot the pistols standards entirely with strong hand only (SHO), and they follow the standard NRA Bullseye “Gallery” course of fire. Place an NRA B-8 at 25 yards and adopt a relaxed low ready position. For the first string of 10 shots, you have 10 minutes to fire for maximum accuracy. For this slow fire portion, reduce the point value of each ring by one (i.e “X-ring” = 10, 10-ring=9, 9-ring=8, etc.). This is not a perfect approximation of a B-16 target, but it’s close enough and saves you from having to buy separate targets.
Stages two and three are timed. For stage two, you will again begin at the low ready and have 20 seconds to fire 5 shots. Repeat this twice for a total of 10 shots. Score your target with the standard printed point value. For stage two, repeat the exact same sequence, but you have 10 seconds to fire 5 shots. Again, repeat this twice for a total of 10 shots.
When you are able to earn at least 255 points three times, you have reached the pistol marksmanship standard.
Level 1 Pistol: Course of Fire (Strong Hand Only)
Total Rounds: 30 | Distance: 25 Yards | Target: NRA B-8
| Stage | Action & Execution | Time Limit | Rounds | Scoring Rules |
|---|---|---|---|---|
| 1 | Slow Fire (Precision) Start at 45° Low Ready (SHO). On signal, raise and fire 10 rounds aimed for maximum accuracy. | 10 Minutes | 10 | Minus-1 Scoring: X-Ring = 10 pts 10-Ring = 9 pts 9-Ring = 8 pts 8-Ring = 7 pts |
| 2 | Timed Fire (Cadence) Start at 45° Low Ready (SHO). On signal, raise and fire 5 rounds within 20 seconds. Repeat for a second string. | 20 sec (per string) | 10 (2 strings of 5) | Standard Scoring: As marked on target. (X/10 = 10 pts) |
| 3 | Rapid Fire (Urgency) Start at 45° Low Ready (SHO). On signal, raise and fire 5 rounds within 10 seconds. Repeat for a second string. | 10 sec (per string) | 10 (2 strings of 5) | Standard Scoring: As marked on target. (X/10 = 10 pts) |
Rifle Shooting
For long guns, we’re following a typical three-position course of fire. I’ve listed standards for carbines/rifles, PCC, rimfire rifles, and precision scoped rifles. Note that the rimfire rifle only applies to standards rimfire rifles like a 10/22 equipped with optics like red dots or prisms. If it’s a PRS Rimfire or NRL22 style rimfire, like my T1x, then it falls into the precision rifle category.
The TQ-4 is the NRA standard 100-yard small bore target. it is slightly more challenging than the typical SR-1 target. The black is larger, which is nice, but the rings themselves are smaller, with the 10-ring being 2″ rather than 3.35″on the SR-1. The TQ-4 is our standard rifle target because it has an 8″ black, which becomes useful for many things in marksmanship and later events.
Note the modifications for each weapon platform. For carbines, rifles, and precision rifle, it’s a 100-yard course of fire. Any hit outside of the 7 ring is a “Critical Fail” and the point value for that stage is 0 regardless of what the other shots did.
For the rimfire stage, shot at 50 yards, only hits in the 9 or 10 ring count.
Level 1 Rifle & Carbine Course of Fire
Universal Rules: All drills shot “Cold”. No Alibis. Pass standard: 240/300 (Rifle) or 255/300 (PCC/Rimfire) or 270/300 (Precision).
| Stage | Action & Execution | Time Limit | Rounds | Scoring Rules |
|---|---|---|---|---|
| RIFLE / CARBINE (100 Yards | NRA TQ-4 | 3-Position) | ||||
| 1 | Standing (Slow Fire) Unsupported (Sling allowed). | 10 Min | 10 | Standard Scoring: CRITICAL FAIL: Any shot outside the 7-ring. |
| 2 | Kneeling (Rapid Fire) Start Standing. Drop to position on signal. | 60 Sec | 10 | Standard Scoring: CRITICAL FAIL: Any shot outside the 7-ring. |
| 3 | Prone (Slow Fire) Start from standing and drop to position. Sling support only (No bipod or bag). | 5 Min | 10 | Standard Scoring: CRITICAL FAIL: Any shot outside the 7-ring. |
| PCC (50 Yards | NRA TQ-4 | 3-Position) | ||||
| 1 | Standing (Slow Fire) Unsupported. | 10 Min | 10 | Standard Scoring: As marked on target. |
| 2 | Kneeling (Rapid Fire) Start Standing. Drop to position on signal. | 60 Sec | 10 | Standard Scoring: As marked on target. |
| 3 | Prone (Slow Fire) Start from standing and drop to position. Sling support only. | 5 Min | 10 | Standard Scoring: As marked on target. |
| RIMFIRE TRAINER (50 Yards | NRA TQ-4 | 3-Position) | ||||
| 1 | Standing (Slow Fire) Unsupported. | 10 Min | 10 | “9-Ring” Rule: 7 & 8 ring = ZERO. Only 9/10 count. |
| 2 | Kneeling (Rapid Fire) Start Standing. Drop to position on signal. | 60 Sec | 10 | “9-Ring” Rule: 7 & 8 ring = ZERO. Only 9/10 count. |
| 3 | Prone (Slow Fire) Start from standing and drop to position. Sling support only (No bipod or bag). | 5 Min | 10 | “9-Ring” Rule: 7 & 8 ring = ZERO. Only 9/10 count. |
| PRECISION RIFLE (100 Yards | NRA TQ-4 | 3-Position) | ||||
| 1 | Standing (Slow Fire) Unsupported (Sling Only). | 10 Min | 10 | Standard Scoring: CRITICAL FAIL: Any shot outside the 7-ring. |
| 2 | Kneeling (Rapid Fire) Sling Only (No Tripods). Build the structure. | 60 Sec | 10 | Standard Scoring: CRITICAL FAIL: Any shot outside the 7-ring. |
| 3 | Prone (Slow Fire) Bipod & Rear Bag Allowed. | 5 Min | 10 | Standard Scoring: CRITICAL FAIL: Any shot outside the 7-ring. |
Level 2: Dynamic Shooting
For this level, we incorporate more “fun” things like drawing, switching hands, and malfunctions. What you see here largely comes from the work of Paul Howe and his excellent standards found in The CSAT Way. I’ve adjusted them slightly so that we continue leveraging the same standard targets (B-8 and TQ-4) and equipment selection.
For Level 2, there are no point values. Everything is either a hit or it’s not, and you either made the standard or you did not.
Pistol Qualification
This is a 10-stage test with a total round count of 25. All stages take place at 7 yards except for the last, which is at 25 yards. Since we’re limiting ourselves to B-8 and TQ-4 targets, completing this course of fire requires two B-8 targets stacked vertically on the backer. The lower one represents the body, the upper one represents the head.
Please note that I’ve added alternative execution instructions to account for revolvers.
Passing Level 2 requires success on 8 out of the 10 stages. If you regularly carry and pistol, I suggest that you work to pass these standards with your carry gun.
Level 2 Pistol Standards (25 round course of fire)
Target: Two B-8s stacked vertically (Top=Head, Bottom=Body).
Distance: All stages at 7 Yards (except Stage 10).
Pass Standard: Must pass 8 of 10 stages. All shots must be inside the Black (5.5″).
| Stage | Drill Name | Par Time | Rds | Procedure & Execution |
|---|---|---|---|---|
| 1 | 1 Shot (Ready) | 1.00s | 1 | Start Low Ready. Fire 1 shot to Body (Bottom Black). |
| 2 | 1 Shot (Draw) | 1.70s | 1 | Start Holstered (Hands at sides). Draw and fire 1 shot to Body. |
| 3 | 2 Shots (Rhythm) | 1.50s | 2 | Start Low Ready. Fire 2 shots to Body. |
| 4 | 5 & 1 (Failure) | 3.00s | 6 | Start Low Ready. Fire 5 shots to Body, transition up, 1 shot to Head (Top Black). Revolver (5-Shot): Fire 4 Body, 1 Head. |
| 5 | 2 & 2 (Vertical Trans) | 3.00s | 4 | Start Low Ready. Fire 2 shots to Body, transition up, fire 2 shots to Head. |
| 6 | Weak / Strong (Transfer) | 5.00s | 4 | Start Low Ready. Fire 2 shots Support Hand Only (Body). Transfer. Fire 2 shots Strong Hand Only (Body). |
| 7 | Malfunction (Tap-Rack) | 3.00s | 1 | Setup Empty Chamber (or dummy). Aim, “Click”, Tap-Rack, fire 1 shot to Body. Revolver: Aim, pull through “click” (dummy), fire next live round. |
| 8 | Reload (Slide Lock) | 5.00s | 4 | Start Low Ready (1 in chamber, empty mag). Fire 1, Slide Lock, Reload, fire 2 to Body. Revolver: Time limit increased to 8.00s. |
| 9 | Rifle Trans (Simulated) | 3.25s | 1 | Start Hands on Chest (simulating rifle hold). “Drop” rifle, Draw pistol, fire 1 shot to Body. |
| 10 | Long Shot (25 Yards) | 3.25s | 1 | Distance: 25 Yards. Start Holstered. Draw, drop to Kneeling, fire 1 shot to Body. |
Rifle/Carbine/PCC Qualification
The rifle/carbine/PCC standards also derive from Paul How’s work at CSAT. This qualification has two phases. The first consists of basic positional shooting and uses a TQ-4 target. The goal is keeping all shots in the 8″ black of the target. Progressively move the target closer for each string (100 yards, 75 yards, 50 yards) with 5 shots each.
Phase 2 begins at 25 yards, and you will switch from a single TQ-4 target to a vertical stack. The lower target represents the body, the upper target represents the head. For the body, you can either use the 8″ black of aTQ-4, or use the 8-ring of the B-8 (also 8″). For the head, the hit zone is the 5.5″ black of the B-8. Only hits in the appropriate zones count.
As you get to the closer stages at 7 yards, you need to know your zero offset to be successful.
Passing standard is 8 out of 10. You will need 38 rounds to complete.
Level 2 Rifle Standards
Pass Standard: Must pass 8 of 10 stages.
Start Condition: Low Ready, Safety ON, Finger Straight.
| Stage | Drill Name | Par Time | Rds | Procedure & Hit Requirement |
|---|---|---|---|---|
| DISTANCE PHASE (Target: NRA TQ-4 | Hit Zone: 8″ Black) | ||||
| 1 | 100 Yards (Prone) | 20.00s | 5 | Start Standing. Drop to Prone. Fire 5 shots. Must hit the 8-inch Black. |
| 2 | 75 Yards (Kneeling) | 20.00s | 5 | Start Standing. Drop to Kneeling. Fire 5 shots. Must hit the 8-inch Black. |
| 3 | 50 Yards (Kneeling) | 20.00s | 5 | Start Standing. Drop to Kneeling. Fire 5 shots. Must hit the 8-inch Black. |
| CQB PHASE (Target Stack: NRA B-8 for head, TQ-4 or B-8 for body | Head Hit Zone: 5.5″ Black) | ||||
| 4 | 25 Yards (Standing) | 8.00s | 5 | Start Standing. Fire 5 shots to Body (Bottom Black). |
| 5 | 1 Shot (Ready) | 1.00s | 1 | 7 Yards. Up, Safety Off, 1 Body. Watch mechanical offset. |
| 6 | 2 Shots (Rhythm) | 1.50s | 2 | 7 Yards. Up, Safety Off, 2 Body. |
| 7 | Failure (2 & 1) | 1.75s | 3 | 7 Yards. 2 Body (Bottom), 1 Head (Top). |
| 8 | 5 & 1 (Recoil) | 3.00s | 6 | 7 Yards. 5 Body (Bottom), 1 Head (Top). |
| 9 | 2 & 2 (Vert. Trans) | 3.00s | 4 | 7 Yards. 2 Body (Bottom), Transition, 2 Head (Top). |
| 10 | Transition (To Pistol) | 3.25s | 1+1 | 7 Yards. Fire 1 Rifle (Empty), Drop Rifle, Draw Pistol, Fire 1 to body or head. Pistol shot must be in Black. |
Precision Rifle Qualification
For precision rifles, it’s a bit slower paced. There are only 10 shots. All shooting happens at 100 yards using a B-8 target, the goal is keeping all shots within the 8-ring (8″) except for the critical shots, which must stay within the 5.5″ black of the B-8.
You must pass all five stages to complete the standard.
Level 2 Precision Rifle Standard
Scoring: BLACK (5.5″) for Cold Bore | 8-RING (8.0″) for Everything Else
Constraint: No Alibis. Must Pass All 5 Stages.
| Stage | Drill Name | Par Time | Rds | Procedure & Hit Zone |
|---|---|---|---|---|
| 1 | Cold Bore | 60.00s | 1 | Prone. Start on gun. Fire 1 round. Zone: THE BLACK (5.5″) |
| 2 | Quick Shot | 10.00s | 1 | Start Standing. Drop to Prone. Fire 1 round. Zone: 8-RING (8.0″) |
| 3 | Positional | 15.00s | 3 | Start Standing. Drop to Kneeling/Sitting (Sling). Fire 3 rounds. Zone: 8-RING (8.0″) |
| 4 | Barricade | 12.00s | 2 | Start Standing about two yards from cover. Move to cover. Fire 2 rounds Using barricade for support. Zone: 8-RING (8.0″) |
| 5 | The Scramble | 35.00s | 3 | Start Prone. Fire 1. Move to Kneeling. Fire 1. Move to Standing (Sup). Fire 1. Zone: 8-RING (8.0″) |
Level 3: Multiple Targets, Static Position
At this level, we build on the marksmanship fundamentals and dynamics built from the first two levels and bring it to multiple targets. The goal is maintaining a good level of precision while transitioning from target to target. If you’re looking to compete in this kind of thing, something like Steel Challenge would be great- at least for pistols and PCCs.
Each platform only has one drill with a par time. Work to get as fast as possible while maintaining accuracy. Note that the spacing between targets increases as the targets get further.
Level 3: Multiple Targets, Static Position
Setup: Three (3) NRA B-8 Targets arranged side-by-side.
Pass Standard: All shots must be inside the BLACK (5.5″) of a B-8. A single shot in the white is a Fail.
| Platform | Drill Name | Time | Rds | Procedure & Execution |
|---|---|---|---|---|
| PISTOL STANDARDS (10 Yards) | ||||
| Pistol | The Vice Presidente | 15.00s | 12 | Setup: 3 Targets. 1 Yard spacing. Start: Holstered, Hands at sides. Facing Downrange. Action: Draw. Fire 2 rounds each (T1-T3). Slide-Lock Reload. Fire 2 rounds each (T1-T3). Revolver: 18.00s (with Speedloader). CRITICAL FAIL: Any shot outside the 5.5″ black. |
| RIFLE / PCC STANDARDS (25 Yards) | ||||
| Carbine | Rifle Vice Presidente | 15.00s | 12 | Setup: 3 Targets. 3 Yard spacing. Start: Low Ready, Safety ON. Action: Up. Fire 2 rounds each (T1-T3). Reload (Bolt Lock). Fire 2 rounds each (T1-T3). CRITICAL FAIL: Any shot outside the 5.5″ black. |
| PRECISION RIFLE STANDARDS (100 Yards) | ||||
| Precision | The Scanner | 35.00s | 6 | Setup: 3 Targets. 10 Yard spacing. Start: Standing, Safety On, Mag Loaded. Action: Drop to Prone. Fire 2 Rounds per target (Left, Center, Right). CRITICAL FAIL: Any shot outside the 5.5″ black. |
Level 4: Movement
At this level, we introduce more movement around the range as well as moving targets. Obviously, you will need a location that allows you do this. That can be a challenge, but it is what it is. Since moving targets are extremely hard to do at anything but professional ranges, we’ll have to discount that and focus on shooter movement.
These begin to look very USPSA/GPA/PCSL. In fact, rather than using my standards here, try to go after getting at least B-Class in one of those leagues.
But if you can’t do that for some reason, here’s some ideas. Once again, we’ll use one test each for pistol, rifle/PCC, and precision rifle.
Pistol Test: The Shuttle
Setup: Two Shooting Boxes (A & B) spaced 7 Yards apart laterally.
Targets: Two B-8s downrange (10 Yards), spaced 2 yards apart.
Procedure:
- Start in Box A, Hands at sides.
- Draw. Fire 2 Rounds each on T1 & T2.
- Run to Box B. Mandatory Reload must happen during the movement.
- Arrive Box B. Fire 2 Rounds each on T1 & T2.
Total Rounds: 8
Par time: 8.00 seconds

Carbine/PCC Test: The Advance
Setup: Start line at 25 Yards. End line at 15 Yards.
Target: One B-8.
Procedure:
- Start at 25y (Low Ready).
- On Signal: Advance aggressively toward the 15y line.
- While Moving: Fire 5 Rounds (must be moving forward).
- At 15y Line: Stop/Plant. Fire 5 Rounds (any position)
Total Rounds: 10.
Constraint: “Moving” shots must be in the 8-Ring (8″). “Planted” shots must be in the Black (5.5″).
Par Time: 7.5 seconds

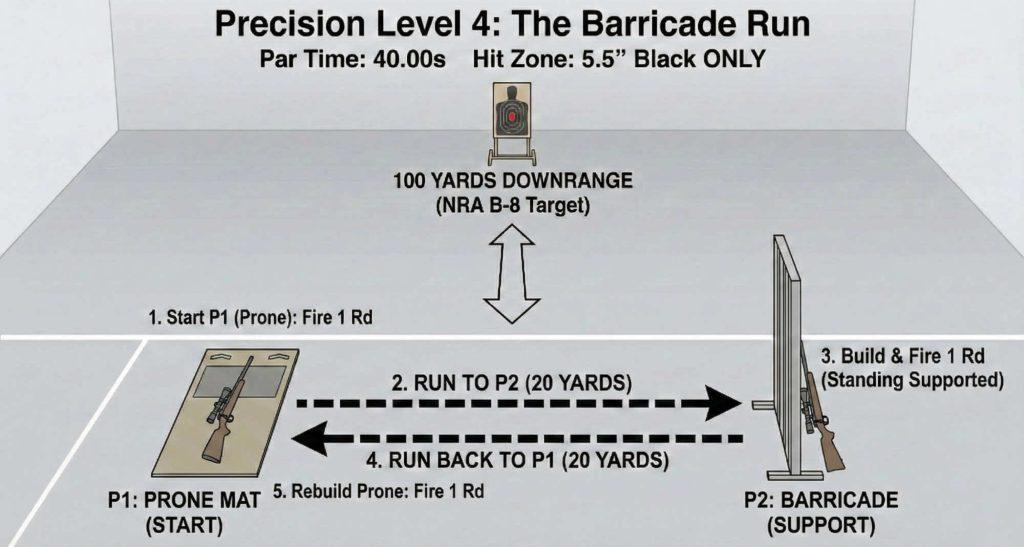
Precision Rifle Test: The Barricade Run
Setup: Two firing positions (P1 and P2) spaced 20 Yards apart.
- P1: Prone.
- P2: Standing Supported (Barricade/Prop).
Target: B-8 at 100 Yards.
Procedure:
- Start Standing at P1 with Rifle Mag in, Bolt Back (Safety on).
- Drop to Prone. Fire 1 Round
- Safe & Up. Run to P2.
- Build Position. Fire 1 Round.
- Safe & Down. Run back to P1.
- Drop to Prone. Fire 1 Round.
Total Rounds: 3.
Pass Standard: All 3 shots in Black (5.5″).
Par Time: 40 seconds.
Level 4: Movement Standards
Goal: Validate entry/exit speed, shooting on the move, and position rebuilding.
Safety: Strict 180° Rule. Finger outside trigger guard during all movement.
| Platform | Drill Name | Time | Rds | Procedure & Execution |
|---|---|---|---|---|
| Pistol | The Shuttle | 8.00s | 8 | Setup: 2 Boxes, 7y apart. 2 Targets at 10y. 1. Box A: Draw, 2 rds each (T1, T2). 2. Sprint to Box B (Reload during move). 3. Box B: 2 rds each (T1, T2). All hits within the 8-ring |
| Carbine | The Advance | 7.50s | 10 | Setup: Start 25y. End 15y. 1. Advance: Fire 5 rds while moving (Zone: 8″). 2. Plant: Stop at 15y. Fire 5 rds (Zone: 5.5″). Minimum standard is 10 hits within the 8-ring, with 5 in the 5.5″ black |
| Precision | Barricade Run | 40.00s | 3 | Setup: Prone Mat & Barricade (20y apart). 1. Prone: Fire 1. 2. Run to Barricade: Build & Fire 1. 3. Run to Prone: Build & Fire 1. All hits in the 5.5″ black |
Level 5: Small Unit Tactics
At this point, you’re at the peak of the marksmanship pyramid. This is where you’re off doing training courses and working with teams to hone proficiency. If you’ve built up a foundation with the levels below, the shooting aspects of SUT training are second-nature and you really don’t have to think about it. Instead, you can focus on the other extremely important aspects of moving as a team, communicating, and making decisions. The shooting stuff just falls into place.
Wrapping Up
So, yeah…this one went on quite a bit longer than I expected when I started out.
The bottom line is that most of us should spend most of our time worrying about the lower levels of the hierarchy. Mastering our fundamentals of both being accurate and fast enough will carry us a long way into future endeavors. Sure, it’s always acceptable to dabble in the fun things we find at the higher levels, like multi target shooting, running around ranges with barricades and such. I’ll always say go for it. But if that’s not what you’re doing most of the time, then the skills degrade quickly.
For that reason, I think it’s a better bet to spend your limited time raising the floor of your fundamentals. Call it the 80/20 rule in action.


